Table of Contents
Some recipes stick with you—not because they’re fancy or complicated, but because they show up when you need them most. This garlic bread grilled cheese is one of those recipes for me. It came into my life during a time when I was burned out, juggling too much, and craving something—anything—that felt grounding. I didn’t have the energy for elaborate meals, but I still wanted comfort. So I reached for the two things I knew would never let me down: garlic bread and grilled cheese.
The first time I made it, I didn’t overthink it. I just smeared garlic butter on the bread, layered in some sharp cheddar and mozzarella, and grilled it until the outside was golden and crackly. I took a bite standing right at the stove. No plate, no side dish—just that perfect blend of garlicky crunch and warm, melty cheese. It stopped me in my tracks. Not because it was gourmet, but because it was exactly what I needed in that small, quiet moment.
Now, I find myself returning to this sandwich more often than I’d like to admit. It’s reliable. It doesn’t ask much from me. Whether I’m eating alone on a rainy afternoon or making a quick dinner before catching up on work, it delivers comfort without the fuss. And over time, it’s become more than just a quick recipe—it’s become a kind of ritual. Something I look forward to when the world feels loud and overwhelming.
Food doesn’t always have to be complicated to be meaningful. Sometimes the best dishes are the ones that remind you to pause, to savor, to enjoy the simple things. This garlic bread grilled cheese is my way of doing that. It matters to me because it brings a little peace to a chaotic day—and sometimes, that’s the most powerful thing a recipe can do.
Why You’ll Fall in Love With This Sandwich
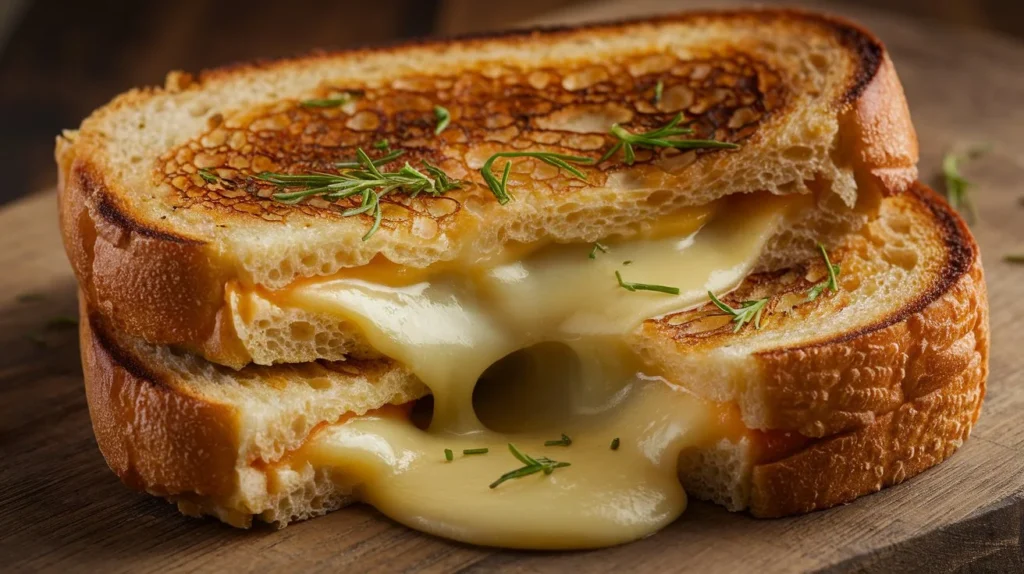
There’s something undeniably special about this sandwich. It goes beyond your average grilled cheese—it’s rich, golden garlic bread cradling a center of melty, savory cheese. It’s the best of two comfort classics wrapped into one bite of pure joy.
This isn’t just food; it’s a little moment of comfort you can make in minutes. Whether you’re short on time or just need a warm pick-me-up, this sandwich delivers. It’s quick, satisfying, and feels like it came from your favorite café—but it’s made right at home.
And don’t worry if you’re not a kitchen pro. If you know how to butter bread and use a skillet, you’ve already got all the skills you need.
Want to get creative? Layer in some tomatoes, sprinkle on red pepper flakes, or tuck in a slice or two of bacon. This sandwich is as flexible as your cravings.
That golden garlic crust? It’s everything. Crisp on the outside, buttery and flavorful, it gives way to a gooey, irresistible center that’ll keep you coming back for more.
The Few Ingredients That Make All the Difference (and How to Sub Them)
You don’t need a long list—just a few pantry staples that each bring their own magic. Here’s how to make them work for you:
Bread
Choose something thick and hearty—white bread, sourdough, or anything that can hold up to all that melted cheese. Brioche adds a soft sweetness, while whole wheat lends a toasty, nutty flavor that grounds the richness.
Butter
Unsalted butter is your best bet—it lets you adjust the seasoning to your liking. Just be sure it’s softened before you start so it spreads easily and coats the bread evenly.
Garlic
Fresh minced garlic gives the boldest flavor, but if you’re in a pinch, garlic powder does the job too. Prefer a milder bite? Roasted garlic adds a subtle, caramelized richness.
Parsley
A sprinkle of chopped fresh parsley brightens everything up, but if you don’t have it, dried parsley works just fine. It’s optional, but it adds a fresh touch.
Cheese
Combining sharp cheddar with mozzarella is a foolproof way to get flavor and that epic cheese pull. But feel free to mix in provolone, Monterey Jack, or gouda—whatever melts your heart.
How to Make Garlic Bread Grilled Cheese: Step-by-Step
1. Mix the Garlic Butter
In a small bowl, stir together softened butter, minced garlic, and parsley until it’s smooth and spreadable. Give it a taste—if it needs a little something, add a tiny pinch of salt to bring the flavors to life.
2. Prep the Bread
Lay out your bread slices and spread the garlic butter generously over one side of each slice. Get it all the way to the edges for the crispiest, most flavorful bite.
3. Add the Cheese
Turn two slices butter-side-down. Pile on the cheese—start with cheddar, then add the mozzarella. Gently press it down just a bit so it stays in place as it melts.
4. Build the Sandwich
Place the other slices on top, buttered side up. Now you’re ready to hit the skillet with these golden beauties.
5. Heat the Skillet
Warm a skillet over medium heat. Give it a minute to come to temperature before adding the sandwiches so the bread toasts evenly.
6. Cook Nice and Slow
Set your sandwiches in the pan and cook for 3 to 4 minutes per side. Press gently with a spatula as they cook to help form that irresistible golden crust. If they start browning too quickly, lower the heat a little. The goal is crispy, not scorched.
7. Let It Rest, Then Dig In
Once it’s perfectly golden and the cheese is melted through, give your sandwich a moment to rest. This lets the cheese settle slightly, so it won’t all spill out the second you cut in. Then slice it up and enjoy every last gooey bite.
Pro Tips for a Perfect Result
- Soften your butter first. It makes spreading easier and prevents tearing your bread.
- Low and slow is the way to go. Let the bread toast slowly so the cheese has time to melt.
- Cover the pan briefly. Trap the heat by covering the skillet for a minute—this helps the cheese melt faster without overcooking the bread.
- Wipe between batches. If you’re cooking more than one round, clean the pan between uses to keep flavors fresh and prevent burning.
- Grate your own cheese. It melts smoother and tastes better than the pre-shredded stuff.
Want to Make It Your Own? Here’s How:
This sandwich is a blank canvas for flavor. Here’s how to give it your own spin:
- Add more layers: Tomato slices, sautéed mushrooms, crispy bacon, or caramelized onions all bring new texture and depth.
- Spice it up: Stir crushed red pepper flakes or hot sauce into the garlic butter for a little kick.
- Try new cheeses: From creamy provolone to smoky gouda, switching up your cheese can totally change the vibe.
- Get herbaceous: Add a little rosemary or thyme to the butter for a herby twist.
- Go dairy-free: Swap in your favorite vegan butter and cheese for a fully plant-based version.
Storing and Reheating Leftovers
If you’ve somehow got extras, here’s how to keep them tasting fresh:
To Store:
Let sandwiches cool completely, then wrap in foil or tuck them into an airtight container. Store in the fridge for up to 2 days.
To Reheat:
- Skillet: Reheat on medium heat, flipping once, until both sides are crispy and the cheese is warm.
- Oven: Heat at 350°F for 8–10 minutes. Wrap in foil to keep it soft inside and crisp outside.
- Avoid the microwave. It softens the bread too much and makes the cheese rubbery.
What to Serve With It
This sandwich is hearty enough to stand alone, but a little something on the side never hurts:
- Tomato soup – classic for a reason.
- Green salad – something fresh to balance all the cheesy goodness.
- Pickles – they add the perfect tangy crunch.
- Fries or chips – go big on the comfort food vibe.
- Roasted veggies – for a more well-rounded plate.
A Final Thought
This isn’t the kind of meal that needs to be perfect. It’s simple, cozy, and full of heart. It’s the edible version of comfort—like a warm hug after a long day. Even if the cheese spills out a little or the crust browns unevenly, it’ll still taste amazing.
Make it your own. Savor every bite. And maybe—just maybe—go ahead and make yourself another.
Garlic Bread Grilled Cheese: Comfort Food Made Easy
Description
This garlic bread grilled cheese recipe takes everything you love about two classics and merges them into one mouthwatering sandwich. Each bite is full of rich garlic butter flavor, perfectly crisped bread, and gooey melted cheese that stretches just right. Ideal for quick lunches, cozy dinners, or anytime you're craving serious comfort.
Ingredients
Instructions
-
Mix Up the Garlic Butter
In a small bowl, combine softened unsalted butter, minced garlic, chopped parsley, and a pinch of salt. Stir until the mixture is smooth and everything is well blended.
If the butter feels too firm to work with, let it sit at room temperature for about 5 to 10 minutes until it becomes easily spreadable.
-
Butter the Bread
Arrange your bread slices on a flat, clean surface like a cutting board or countertop. Spread a thick, even layer of the garlic butter over one side of each slice, making sure to cover right up to the edges for full flavor and a crisp finish.
-
Assemble the Sandwich
Turn two slices over so the buttered side is facing down. On the unbuttered side, layer your cheeses—start with mozzarella for that stretchy melt, then add sharp cheddar for bold, savory depth.
If you like a little spice, sprinkle on a bit of black pepper or red pepper flakes. Cap it off with the remaining slices of bread, making sure the buttered side is now facing outward.
-
Preheat the Skillet
Set a skillet or nonstick pan over medium to medium-low heat. Give it a couple of minutes to heat up—just enough so that when your sandwich hits the surface, it sizzles gently rather than loudly. That steady heat helps the bread toast evenly while giving the cheese time to melt.
-
Toast the Sandwich
Carefully place your sandwiches in the warmed skillet. Cook them slowly, about 3 to 4 minutes per side. Press lightly with a spatula to help develop a golden, crispy crust.
When the underside turns a deep golden brown and feels crisp to the touch, gently flip the sandwich. If the bread browns faster than the cheese melts, reduce the heat slightly and place a lid on the pan for a minute or two to help the cheese soften.
-
Check for Melty Cheese
Peek inside the sandwich using a spatula—once the cheese is fully melted and creamy, it’s ready to come off the heat. Transfer the sandwiches to a cutting board and let them rest briefly.
-
Slice and Serve
Give the sandwiches about a minute to cool so the cheese stays in place when slicing. Cut in halves or diagonals—whatever your preference—and serve while still warm and melty.
Pair with tomato soup, a crisp green salad, or even just your favorite crunchy snack for a cozy, satisfying meal.
Nutrition Facts
Servings 2
- Amount Per Serving
- Calories 450kcal
- % Daily Value *
- Total Fat 28g44%
- Saturated Fat 14g70%
- Trans Fat 0.5g
- Cholesterol 60mg20%
- Sodium 750mg32%
- Potassium 150mg5%
- Total Carbohydrate 30g10%
- Dietary Fiber 2g8%
- Sugars 3g
- Protein 15g30%
* Percent Daily Values are based on a 2,000 calorie diet. Your daily value may be higher or lower depending on your calorie needs.
Note
Grate Your Own Cheese
For the best melt and texture, grate your cheese fresh. Bagged pre-shredded varieties usually contain anti-caking agents that interfere with smooth melting.
Soften the Garlic Flavor
Prefer a milder garlic taste? Gently cook the minced garlic in butter for about 30 seconds before combining it with the parsley. This softens the sharpness while still delivering that aromatic, garlicky flavor.
Choose Bread That Can Hold Up
Opt for hearty bread with some structure. Brioche adds sweetness, sourdough brings a tangy bite, and thick white sandwich bread delivers classic comfort. Thin or delicate slices tend to burn quickly or fall apart once filled with cheese.
Customize with Add-Ins
Make your grilled cheese more exciting by layering in extras—sliced tomatoes, crispy bacon, caramelized onions, or a smear of pesto between the cheese layers. These simple additions turn a simple meal into something special.
Boost the Crust with Parmesan
For an even crispier, more flavorful crust, try pressing a bit of shredded Parmesan onto the buttered side of the bread before toasting. It adds a golden, cheesy crunch that’s hard to resist.
Make It Vegan
You can easily swap in plant-based alternatives. Use vegan butter and your favorite non-dairy cheese, and double-check that your bread doesn’t contain dairy. The flavor and texture will be different, but still incredibly comforting.
Feeding a Crowd?
To keep multiple sandwiches warm and melty while you cook the rest, place them on a baking sheet in a 250°F (120°C) oven. That way, everyone gets to enjoy theirs fresh and hot.