Table of Contents
Desserts in my childhood weren’t elaborate or the kind you’d see perfectly displayed in magazines. We didn’t have elegant pastries or golden-crusted pies resting on the windowsill to cool. But what we did have was flavor—bold, simple, and always made with heart. My mom always kept a few limes on the kitchen counter, nestled beside bananas and half-used onions, and no one ever questioned why. If it was hot out—and it often was—she’d squeeze one over watermelon, into sparkling water, or over grilled chicken. But it was the rare occasion she made key lime pie that really stuck with me. It wasn’t an everyday dessert; it was something you made for a birthday, a goodbye, or the first cookout of the summer. And when she did, it was magic. Creamy, bright, and cold as ice, with a buttery crust that clung to the spoon just enough to feel indulgent.
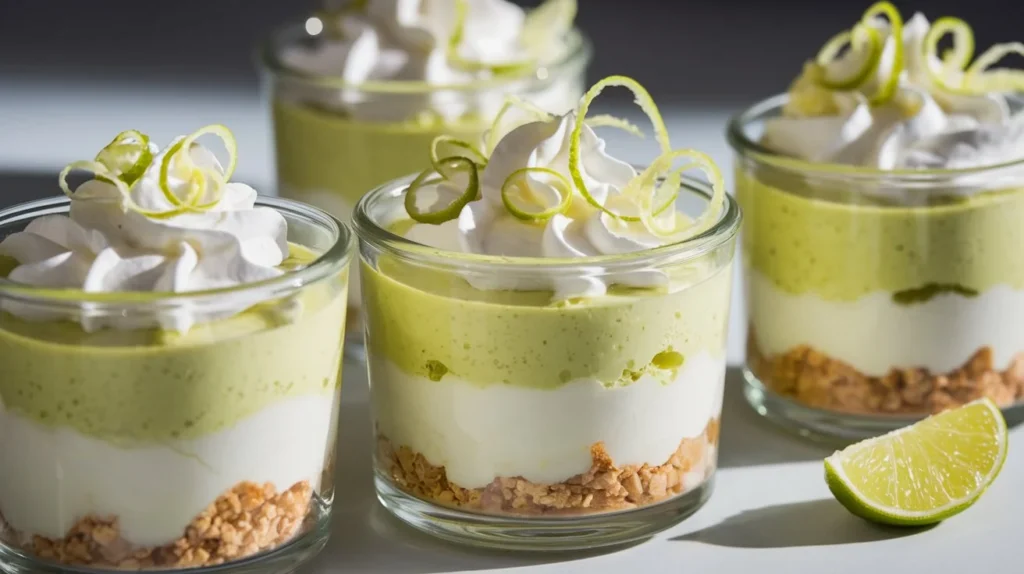
Years later, I found myself craving that same taste—fresh, tangy, comforting—but didn’t want to fuss with a full pie, especially not in the middle of July when turning on the oven feels like a crime. So I improvised, layering all the same nostalgic flavors into jars: crushed graham crackers, a luscious lime filling, and a cloud of whipped topping. No baking. No slicing. Just grab a spoon and dig in. These Key Lime Pie Jars were born out of that moment—equal parts laziness and love—and somehow, they turned out better than I expected.
What I adore most is how they feel both casual and a little special. They’re easy enough to throw together for a weeknight treat but charming enough to line up on a table for guests. I’ve taken them to potlucks, picnics, and even packed them in a cooler for beach days. The best part? People light up when you hand them their own little jar. It’s not just dessert—it’s a moment, a memory, a personal serving of something cool, creamy, and full of sunshine.
And every time I make them, I think of those quiet afternoons in my mom’s kitchen, where something as simple as a squeeze of lime could transform the ordinary into something worth remembering.
Why You’re Going to Love These Key Lime Pie Jars
You know those desserts that instantly make you smile—the kind that feels both nostalgic and refreshingly new? That’s what these Key Lime Pie Jars are all about. They take everything we love about traditional key lime pie—the creamy texture, the bright citrus zing, that buttery graham cracker bite—and wrap it up in the cutest, easiest-to-enjoy package ever.
No baking. No slicing. No stress. Just pure, scoopable happiness in a jar.
Here’s what makes them so special (and why they’re about to become your go-to treat):
You don’t even need an oven
These are 100% no-bake, which means no heating up the kitchen, no complicated prep, and zero chance of anything burning. They come together fast, chill beautifully, and taste like a sunny vacation in dessert form.
Perfectly portable and party-friendly
Because they’re served in individual jars, they’re basically made for get-togethers—think birthdays, baby showers, picnics, or just a cozy night in. No cutting, no plating, no cleanup. Just twist off the lid and dig in.
Simple, familiar ingredients
You won’t need to scour the store for anything fancy. In fact, you probably already have most of what you need on hand—and the rest is easy to find at any grocery store.
They’re make-ahead friendly
These jars chill in the fridge like champs. Whip them up a day or two ahead and you’ve got a dreamy dessert ready when you are. Talk about stress-free hosting!
Flavor that’s fresh, creamy, and just the right amount of sweet
Think smooth, citrusy filling with a buttery crunch from the crust. It’s rich but not heavy, tangy but not tart. Every bite is pure delight.
What You’ll Need (And Easy Ways to Mix Things Up)
The ingredients are super straightforward, but if you’re in the mood to get a little creative, here’s how to do it:
- Graham Cracker Crumbs: The base of that classic crust. No crumbs? Just crush whole crackers in a bag or food processor. Want to change it up? Try vanilla wafers or gingersnaps for a fun twist.
- Melted Butter: Helps hold the crust together. If all you have is salted butter, it’s totally fine—just leave out any extra salt.
- Granulated Sugar: Adds a little sweetness and texture to the crust. You can use brown sugar instead for a deeper, slightly caramelized flavor.
- Cream Cheese: Full-fat gives the richest texture, but reduced fat will work if that’s what’s in your fridge.
- Sweetened Condensed Milk: This is non-negotiable—it’s what makes the filling thick, smooth, and sweet.
- Key Lime Juice: Fresh-squeezed key limes are amazing, but bottled juice (like Nellie & Joe’s) is a great backup. Even regular lime juice works in a pinch—it’ll just have a bit more bite.
- Whipped Topping (like Cool Whip): Keeps things light and fluffy. Feeling fancy? Homemade whipped cream is always a great touch.
- Lime Zest (optional): Adds a pop of brightness and color. A little goes a long way.
Let’s Make Them! (Step-by-Step & Totally Doable)
1. Make the crust
Mix your graham cracker crumbs, melted butter, and sugar until it looks like damp sand. Press a spoonful or two into the bottom of each jar. Doesn’t need to be perfect—just give it a little press to pack it down.
2. Blend the filling
In a bowl, beat the softened cream cheese until it’s smooth (no lumps allowed!). Add the condensed milk and mix again. Slowly stir in the lime juice, then gently fold in your whipped topping until everything is light and creamy.
3. Layer it up
Spoon or pipe the filling on top of the crust. Leave a little room at the top for whipped cream or any toppings you want to add later.
4. Chill
Cover the jars and pop them in the fridge for at least two hours (overnight is even better). This lets the filling set and all the flavors meld together.
5. Add the final flourish
Right before serving, top with a swirl of whipped cream, a sprinkle of lime zest, or even a little graham cracker piece for crunch. It’s those small touches that make them look extra special.
A Few Tips for Sweet Success
- Room temp cream cheese is your best friend
Softened cream cheese blends like a dream. Cold cream cheese? Not so much. Give it time to warm up on the counter before you start. - Chill time isn’t optional
This isn’t just for structure—it’s where the flavor magic happens. Give them time to firm up and get that perfectly creamy texture. - Use a piping bag or zip-top bag
If you want those picture-perfect layers, this trick makes filling the jars neat and easy. - Pretty it up!
Even a simple dessert looks bakery-ready with a little garnish. A wedge of lime, some zest, or a crumbly graham cracker on top = chef’s kiss. - Stick to uniform jars
If you’re making these for a crowd, using jars of the same size keeps things tidy and makes serving easier.
Want to Make It Your Own? Here’s How:
- Gluten-Free: Use gluten-free graham crackers or cookies.
- Dairy-Free: Go with plant-based alternatives like vegan cream cheese, coconut condensed milk, and dairy-free whipped cream.
- Tropical Twist: Add a spoonful of shredded coconut or a few chunks of pineapple or mango on top.
- Berry Layers: Spoon in a bit of berry puree between the crust and the filling for a fruity surprise.
- Mini Cheesecake Jars: Skip the lime juice, add a splash of vanilla instead, and boom—classic cheesecake flavor.
Storing & Serving Tips
- In the fridge: These stay fresh and delicious for up to 5 days. Just hold off on garnishing until you’re ready to serve.
- Freezer-friendly? Yes!: Leave off the toppings, seal them tightly, and freeze for up to a month. Let them thaw in the fridge overnight before serving.
- No reheating, ever: These are meant to be enjoyed cold—straight from the fridge or thawed from the freezer.
How to Serve Them Like a Pro
- Add a handful of fresh berries or a dollop of berry sauce
- Serve with an iced latte or fruity tea for a refreshing treat
- Stick in a graham cracker or cookie for a little edible “spoon”
- Make a mini dessert bar with other jar treats for a wow-worthy spread
A Little Encouragement Before You Start
Whether you’re hosting a get-together, packing up a picnic, or just in need of a pick-me-up dessert at home, these Key Lime Pie Jars are the answer. They’re easy to make, even easier to love, and look like they came from a fancy bakery—even though they only took you minutes to prep.
They’re creamy, zesty, cheerful, and completely crave-worthy.
So grab your jars, your limes, and your favorite spoon. There’s a little bit of sunshine waiting for you in every bite—and you deserve it.
The Best Key Lime Pie Jars Recipe – Light, Creamy & Zesty
Description
This no-bake Key Lime Pie Jars recipe transforms the tangy, creamy goodness of traditional key lime pie into perfectly portioned desserts layered in jars. With a buttery graham cracker crust, smooth citrus filling, and a fluffy whipped topping, these jar pies are not only delicious—they're also make-ahead, portable, and irresistibly cute. Ideal for parties, picnics, or a little treat just for you.
Ingredients
Instructions
-
Make your crust base
Grab a mixing bowl and toss in the graham cracker crumbs, melted butter, and a bit of sugar. Stir it all together until it clumps together like beach sand that’s just damp enough to build a proper sandcastle. That’s exactly the feel you’re going for—it should hold its shape but still feel crumbly. This buttery base is your jar’s first impression, and it’s a good one.
-
Press into jars
Scoop about 2 to 3 tablespoons of your crust mixture into each jar (6 to 8 oz mason jars are just right). Use the back of a spoon or a small glass to press it down gently until it forms an even, packed layer. Don’t overthink it—just make sure it’s firm enough to stay put. Set them aside while you work on the filling.
-
Cream the cream cheese
Take your room-temperature cream cheese (don’t skip softening it!) and beat it with a hand mixer until smooth and creamy—no lumps allowed. Give it a minute or two; the smoother this part is, the dreamier your filling will turn out.
-
Add the condensed milk
With the mixer still going, slowly pour in the sweetened condensed milk. Scrape the bowl a few times to make sure every bit gets mixed in. You’ll see the texture go from thick to smooth and glossy—like pie-filling magic unfolding right in front of you.
-
Mix in key lime juice
Now comes the citrus star of the show—key lime juice. Pour it in gradually while mixing. As soon as it hits the creamy base, it starts to thicken slightly, which is your cue that everything’s blending just right. That fresh lime aroma? It’s the best kind of reward.
-
Fold in the whipped topping
Swap out your mixer for a spatula and gently fold in the whipped topping. Don’t stir it too hard—you want to keep that fluffy texture. Think of it like folding clouds into your pie. Once it’s all combined, the filling will be light, creamy, and full of tangy promise.
-
Assemble the jars
Spoon or pipe the filling over your crust layer, filling the jars about ¾ of the way up. Give each jar a gentle tap on the counter to help the filling settle, then smooth the tops with a spoon if you’d like them looking a little fancy.
-
Chill and let it set
Cover your jars with lids or plastic wrap and slide them into the fridge. Give them at least 2 hours to chill—overnight is even better. The filling will firm up, and the flavors will mellow into something really special. It’s the kind of patience that tastes totally worth it.
-
Time to garnish and serve
Right before serving, crown each jar with a little whipped topping. Add a pinch of fresh lime zest or a slim wedge of lime for a bright, zesty finish. Serve them cold, straight from the jar, spoons ready—simple, pretty, and downright delightful.
Nutrition Facts
Servings 6
- Amount Per Serving
- Calories 360kcal
- % Daily Value *
- Total Fat 24g37%
- Saturated Fat 14g70%
- Cholesterol 60mg20%
- Sodium 210mg9%
- Potassium 160mg5%
- Total Carbohydrate 43g15%
- Dietary Fiber 1g4%
- Sugars 30g
- Protein 5g10%
* Percent Daily Values are based on a 2,000 calorie diet. Your daily value may be higher or lower depending on your calorie needs.
Note
Let the cream cheese warm up:
Seriously, don’t skip this. Cold cream cheese is impossible to mix smoothly, and lumpy filling is just... sad. Give it 30–45 minutes on the counter to get soft and ready.
Whipped topping vs. homemade cream:
I’m all for shortcuts, so store-bought whipped topping is my go-to when I’m short on time. But if you’re in the mood to go homemade, whip 1 cup of heavy cream with 2 tablespoons of powdered sugar until soft peaks form. It’s richer and has that fresh, just-whipped feel.
Pick the right jars:
Mason jars (6 to 8 oz) are perfect—sturdy, portable, and cute. You can also use Weck jars or even clear plastic cups if you’re serving a crowd. Just make sure whatever you pick is food-safe and sealable.
Plan ahead:
These taste even better after a few hours in the fridge, so they’re ideal for making ahead. I like prepping them the night before and adding the garnish right before serving so everything looks fresh and vibrant.
Craving extra lime flavor?
Add a little zest from the key limes right into the filling. It kicks up the citrus vibe and makes the whole thing smell like summer in a jar.
Want it less sweet?
You can ease up on the sweetened condensed milk by 2–3 tablespoons if you prefer a less sugary dessert. Just taste as you go—key lime is naturally tart, so keeping a balance is key.
Freezer-friendly, too!
Yep, these freeze beautifully. Leave off the topping, seal the jars tight, and pop them in the freezer for up to a month. When you're ready to serve, thaw them in the fridge and add your garnish fresh. Handy for parties or whenever dessert cravings hit.