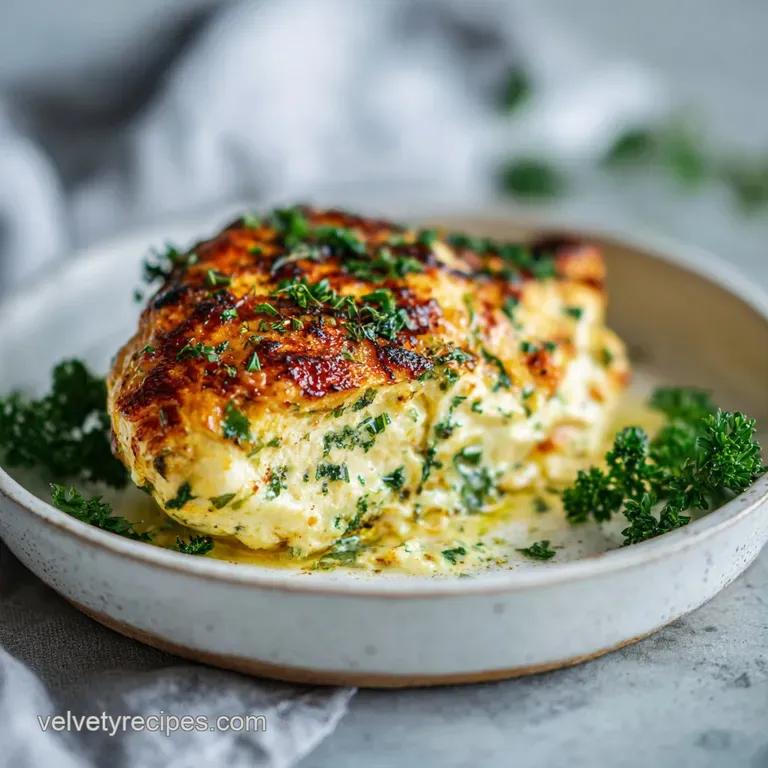
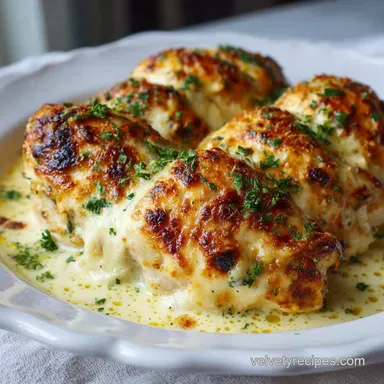
Easy Baked Ricotta Chicken
- Time: Active 10 minutes, Passive 20 minutes, Total 30 minutes
- Flavor/Texture Hook: Velvety ricotta meets a bubbling mozzarella crust
- Perfect for: Stress free weeknight dinners or high protein meal prep
- Mastering This Easy Baked Ricotta Chicken Recipe
- Science Behind the Juicy Ricotta Barrier
- Component Analysis for Better Flavor
- Precise Specs for Reliable Results
- Kitchen Tools for Minimal Cleanup
- Executing the Perfect Bake Sequence
- Navigating Common Mistakes and Fixes
- Smart Substitutions for Dietary Needs
- Storage Methods for Future Meals
- Vibrant Pairings for Balanced Plates
- High in Sodium
- Recipe FAQs
- 📝 Recipe Card
Mastering This Easy Baked Ricotta Chicken Recipe
The smell of garlic hitting the heat of the oven is one of those things that instantly makes a house feel like a home. I remember one Tuesday evening when I was staring at a pack of chicken breasts, feeling completely uninspired. I’d made every version of pan seared chicken imaginable, and frankly, I was bored.
I had half a tub of ricotta left over from a lasagna project and decided to just slather it on top before sliding the tray into the oven.
The result was a total win. Instead of the usual struggle with dry meat, the chicken stayed incredibly juicy under that creamy blanket. It felt like a million dollars, but it took less effort than boiling a pot of pasta.
My friend came over that night, took one bite, and immediately texted me asking for the "secret sauce." Since then, this Easy Baked Ricotta Chicken has become my go to recommendation for anyone who thinks they don't have time to cook a "real" meal.
We've all been there, hovering over a pan, hoping the center is cooked before the outside turns to cardboard. This method removes all that guesswork. By using the cheese as a protective layer, you're essentially creating a mini oven for the meat itself.
It's foolproof, fast, and uses ingredients you probably already have in the fridge. Let's get into why this works so well.
Science Behind the Juicy Ricotta Barrier
The Insulation Effect: The thick layer of ricotta acts as a thermal buffer, slowing down the heat transfer to the chicken fibers and preventing them from tightening too quickly.
Lactic Acid Tenderization: Natural acids found in ricotta and parmesan gently break down lean protein structures, ensuring the meat remains tender even at high temperatures.
Moisture Retention: The egg binder creates a semi permeable seal that traps internal steam inside the breast while the fat from the cheese adds a silky mouthfeel.
| Thickness | Internal Temp | Rest Time | Visual Cue |
|---|---|---|---|
| 1.5 cm | 74°C | 3 mins | Juices run clear |
| 2.5 cm | 74°C | 5 mins | No pink in center |
| 3.5 cm | 74°C | 7 mins | Meat feels firm |
When we talk about getting that restaurant quality finish at home, it usually comes down to heat management. If you toss a naked chicken breast into a hot oven, the exterior dries out before the middle is safe to eat. By adding that ricotta cap, you’re basically giving the chicken a spa day while it bakes.
The moisture stays put, and the flavors of the garlic and spinach have time to sink into the meat.
Insulating the Protein for Maximum Juiciness
Think of the ricotta as a protective shield. Lean breasts lack the fat needed to stay moist under direct heat, so we're providing that fat externally. As the cheese melts and sets, it creates a humid micro environment.
Whipped Texture for Better Mouthfeel
Lightly beating the egg before mixing it into the cheese is a small move that pays off. It introduces tiny air bubbles that expand in the heat, giving you a topping that is light and pillowy rather than dense and heavy.
Harnessing Heat without Overcooking
Using a higher oven temperature (200°C) for a shorter duration allows the mozzarella to brown and bubble without giving the chicken enough time to lose its structural moisture. It's a balance of speed and protection.
Component Analysis for Better Flavor
| Ingredient | Science Role | Pro Secret |
|---|---|---|
| Ricotta Cheese | Thermal Insulator | Use full fat for a silkier finish |
| Large Egg | Protein Binder | Room temp prevents cheese clumping |
| Parmesan Cheese | Umami Booster | Grate it fresh for better melting |
| Fresh Spinach | Moisture Balance | Squeeze dry to avoid a watery pan |
Choosing the right components makes a huge difference in the final texture. If you’re looking for a similar vibe but with a different flavor profile, you might enjoy my Baked Lemon Pecorino recipe which uses a citrus forward crust. For this dish, though, we’re leaning into that classic Italian comfort profile that everyone loves.
Precise Specs for Reliable Results
For this recipe, we are using standard metric measurements to ensure consistency. If your chicken breasts are particularly large (over 170g), you might need to add a few minutes to the timer.
- Protein Base: 4 (170g) boneless skinless chicken breasts Why this? Standard size ensures even cooking across the tray.
- Seasoning Trio: 1 tsp Kosher salt, 0.5 tsp cracked black pepper, 1 tsp garlic powder.
- The Creamy Cap: 1 cup part skim ricotta cheese Why this? Ricotta provides the moisture locking barrier.
- The Salty Kick: 0.5 cup grated Parmesan cheese.
- The Binder: 1 large egg, lightly beaten.
- The Greens: 2 cups fresh baby spinach, chopped Why this? Adds color and earthy notes to the cheese.
- Aromatics: 2 cloves garlic, minced, and 1 tsp Italian seasoning.
- The Finish: 0.5 cup low sodium marinara sauce and 0.5 cup shredded part skim mozzarella cheese.
- Garnish: Fresh basil leaves.
The Lean Protein
I always suggest patting the chicken completely dry with a paper towel before you even think about seasoning it. If the surface is wet, the spices won't stick, and the meat will steam rather than roast. It’s a small step that makes a big difference in the final texture.
The Herb Infused Ricotta Base
Don't just dump the spinach in. If it's too wet, you'll end up with a puddle in your baking dish. Give it a quick chop and a squeeze. Mixing the garlic and Italian seasoning directly into the cheese ensures every bite is packed with flavor.
Kitchen Tools for Minimal Cleanup
You don't need a high end kitchen to make this work, but having the right basics helps. A standard 9x13 inch (23x33 cm) baking dish is the best tool for the job. It gives the chicken enough room so the pieces aren't touching, which helps the hot air circulate and prevents the meat from stewing in its own juices.
I also highly recommend a digital meat thermometer. Honestly, stop guessing if your chicken is done. It’s the fastest way to ruin a dinner. If you hit 74°C, pull it out. It will continue to rise a few degrees as it rests.
A simple mixing bowl for the ricotta and a sharp knife for the spinach are the only other things you'll really need to get this on the table.
| Feature | This Recipe (Fast) | Classic Stuffed Chicken |
|---|---|---|
| Active Prep | 10 minutes | 25 minutes |
| Skill Level | Beginner | Intermediate |
| Cleanup | One bowl, one pan | Multiple pans and toothpicks |
Executing the Perfect Bake Sequence

- Preheat your oven to 200°C. Note: A hot oven is key for browning the cheese.
- Pat the 4 chicken breasts dry and season both sides with salt, pepper, and garlic powder.
- Place the seasoned chicken in a lightly greased baking dish.
- In a medium bowl, combine 1 cup ricotta, 0.5 cup Parmesan, the beaten egg, chopped spinach, minced garlic, and Italian seasoning.
- Mix until the spinach is evenly distributed through the creamy cheese.
- Spread the ricotta mixture generously over the top of each chicken breast.
- Top each breast with 2 tablespoons of marinara sauce. Note: This adds acidity to cut through the rich cheese.
- Sprinkle 0.5 cup mozzarella over the tops.
- Bake for 20 minutes until the cheese is bubbling and golden.
- Let the chicken rest for 5 minutes before serving with fresh basil.
Chef's Tip: If you want an extra crispy top, turn on the broiler for the last 2 minutes of cooking. Just keep a close eye on it so it doesn't go from golden to burnt in a heartbeat!
Navigating Common Mistakes and Fixes
One thing I see people struggle with is the "watery sauce" problem. This usually happens if the chicken releases too much liquid or the spinach wasn't dried properly. If you see a lot of liquid in the pan halfway through, don't panic.
You can carefully spoon some out, or just let it be the chicken will still taste great, it just might be a bit more "saucy."
Another pitfall is using cold chicken straight from the fridge. If you have 10 minutes, let the meat sit on the counter for a bit. Cold meat takes longer to cook in the middle, which means the outside might get overdone while you're waiting for the center to reach temperature.
Why Your Ricotta Is Gritty
High heat can sometimes cause ricotta to grain out if it's very low in fat. The egg helps stabilize it, but using a quality brand makes a world of difference. Look for "galbani" or a local dairy brand that doesn't have a ton of fillers or gums.
Why Your Chicken Is Tough
Overcooking is the primary culprit here. Even with the ricotta protection, an extra 10 minutes in the oven will turn any breast into rubber. This is where that thermometer earns its keep. Once you hit 74°C, you are golden.
Eliminating Excess Wateriness
If you use frozen spinach instead of fresh, you must thaw it and wring it out in a clean kitchen towel. Frozen spinach holds a surprising amount of water that will absolutely ruin the consistency of your topping.
| Problem | Root Cause | Solution |
|---|---|---|
| Topping sliding off | Chicken was too wet | Pat meat dry before adding cheese |
| Bland flavor | Not enough salt in cheese | Taste and season the ricotta mixture |
| Rubber texture | Internal temp too high | Pull chicken at 74°C exactly |
Common Mistakes Checklist
- ✓ Didn't pat the chicken dry? The topping won't stay put.
- ✓ Forgot to beat the egg? The ricotta will be dense and flat.
- ✓ Overcrowded the pan? The chicken will steam, not roast.
- ✓ Skipped the resting period? All those lovely juices will run out on the plate.
- ✓ Used pre shredded mozzarella? It has starch that prevents a smooth melt.
Smart Substitutions for Dietary Needs
If you are looking to scale this recipe up for a big family gathering, it’s quite simple. For 8 people, just double everything and use two baking dishes. Don't try to cram 8 breasts into one tray; the air needs to move to get that cheese bubbly.
If you’re cooking for just two, you can easily halve the recipe, though I’d still use one whole egg for the binder it just makes the texture better.
Swapping for Baked Ricotta Chicken Thighs
If you prefer dark meat, you can absolutely use boneless, skinless thighs. They are much more forgiving and stay juicy even if you overcook them slightly. Increase the bake time by about 5 to 7 minutes, as thighs are denser than breasts.
Creating a Keto/Low Carb Version
This recipe is already naturally very low in carbs (only 7.5g per serving!). To keep it strictly keto, make sure your marinara sauce has no added sugar. You can also swap the marinara for a dollop of pesto if you want to switch up the flavor profile entirely. For another quick chicken idea, my Cowboy Butter Chicken recipe is a fantastic low carb option.
| Original Ingredient | Substitute | Why It Works |
|---|---|---|
| Ricotta Cheese | Cottage Cheese | High protein, lower fat. Note: Blitz in a blender first for smoothness. |
| Marinara Sauce | Pesto | Adds a punchy, herbal flavor. Note: Higher in fat/calories than marinara. |
| Baby Spinach | Kale | Holds its structure better. Note: Remove tough stems before chopping. |
Storage Methods for Future Meals
This is one of those dishes that actually tastes pretty great the next day. The flavors in the cheese mixture have more time to mingle. If you're meal prepping, you can portion the cooked chicken into airtight containers.
- Fridge: Store in an airtight container for up to 3 days.
- Freezer: You can freeze the cooked chicken for up to 2 months. However, the texture of the ricotta might change slightly it can become a little more crumbly after thawing.
- Reheating: The best way to reheat is in the oven at 170°C for about 10 minutes. This helps the cheese get soft again without making the chicken rubbery. If you use a microwave, use a lower power setting and cover the dish to trap steam.
- Zero Waste: If you have leftover ricotta mixture, it makes a fantastic spread for toast or can be stirred into a bowl of warm pasta for a quick lunch. Don't let those herb scented scraps go to waste!
Vibrant Pairings for Balanced Plates
Because this Easy Baked Ricotta Chicken is quite rich and creamy, I love pairing it with something that has a bit of "crunch" or acidity. A simple arugula salad with a lemon vinaigrette is usually my first choice. The peppery greens cut right through the cheese.
If you want something heartier, a side of roasted broccoli or some garlic butter zoodles works perfectly. If you aren't watching your carbs, a small nest of angel hair pasta tossed in the leftover pan juices is basically heaven. If you're looking for a completely different vibe for your next meal, you might want to try a Slow Cooker Chicken recipe for those days when you want dinner to cook itself while you're at work.
Light and Fresh Pairings
I often serve this with roasted cherry tomatoes on the vine. You can actually toss them into the same baking dish during the last 10 minutes of cooking. They burst and create a natural sauce that complements the marinara beautifully.
Hearty Italian Comfort
For a full Sunday style feast, serve this alongside some crusty garlic bread. Use the bread to swipe up any of the melted mozzarella and ricotta that escaped onto the pan. It's the kind of meal that makes everyone at the table go quiet because they're too busy enjoying every bite.
| Goal | Adjustment | Result |
|---|---|---|
| Extra Creamy | Add 2 tbsp cream cheese to mix | Richer, denser topping |
| Spicy Kick | Add 0.5 tsp red pepper flakes | Balanced heat with the dairy |
| More Veggies | Add finely diced bell peppers | Extra crunch and color |
One last thing don't forget the fresh basil at the end. It’s not just for looks. That hit of fresh, aromatic herb right before you eat lifts the whole dish and makes it taste like it came from a professional kitchen. Trust me, your friends will be impressed. Enjoy your dinner!

High in Sodium
945 mg of sodium per serving (41% of daily value)
The American Heart Association recommends limiting sodium intake to no more than 2,300mg per day for most adults.
Tips to Reduce Sodium in this Stuffed Chicken Recipe
-
Choose Low-Sodium Cheese-15%
Parmesan cheese is a significant source of sodium. Opt for a low-sodium or reduced sodium Parmesan or Romano cheese. You can also reduce the quantity used, or use a blend of Parmesan and nutritional yeast.
-
Reduce Added Salt-15%
This recipe calls for 1 tsp of Kosher salt. Try reducing it to 0.5 tsp or less, and taste as you go. You might not need as much as you think, especially with the salty cheese and marinara sauce.
-
Low-Sodium Marinara-10%
Ensure your marinara sauce is truly low sodium, with less than 140mg sodium per serving. You can also make your own marinara sauce from scratch to fully control the sodium content.
-
Boost Flavor with Herbs
Enhance the flavor by using a generous amount of fresh herbs like basil, oregano, and parsley. This will help compensate for the reduction in salt without sacrificing taste.
Recipe FAQs
Can I use chicken thighs instead of breasts?
Yes, dark meat works very well. Thighs are more forgiving regarding heat and stay juicy longer; you will likely need to increase the baking time by about 5 to 7 minutes.
How long should the chicken rest after baking?
Rest for a minimum of 5 minutes. This crucial step allows the muscle fibers to relax and redistribute the internal juices, ensuring maximum tenderness when you slice into the meat.
What is the ideal oven temperature for baking this dish?
Bake at 200°C (400°F). This higher heat ensures the cheese melts and browns quickly, forming a protective crust before the chicken loses significant internal moisture.
Why is my ricotta topping gritty or separating?
This usually happens due to high heat or low-fat cheese without enough binder. Ensure your egg is thoroughly mixed in to stabilize the emulsion; if you enjoyed mastering the structure here, you’ll find similar stability principles apply when preparing a great Congo Bars Recipe topping.
How do I prevent the chicken from releasing too much water into the pan?
Pat the chicken completely dry with paper towels before seasoning. Excess surface moisture steams the meat rather than roasting it, leading to a watery base; aim for dry protein contact with the seasoning.
Can I prepare the ricotta topping ahead of time?
Yes, you can make the mixture up to 24 hours in advance. Store the prepared topping covered in the refrigerator, and allow it to sit at room temperature for about 20 minutes before spreading to ensure easy application.
What is a good side dish pairing for this rich baked chicken?
Pair it with a bright, acidic side like a simple green salad. The richness of the cheese needs a light counterpoint; if you are seeking a heartier, carb focused alternative, consider a side of Noodles Romanoff Baked recipe.
Easy Baked Ricotta Chicken
Ingredients:
Instructions:
Nutrition Facts:
| Calories | 404 kcal |
|---|---|
| Protein | 56.5 g |
| Fat | 17.1 g |
| Carbs | 7.5 g |
| Fiber | 1.2 g |
| Sugar | 2.8 g |
| Sodium | 945 mg |
