Easy Chocolate Mousse Cake: Rich and Velvety
- Time:20 minutes active + 4 hours 20 mins chilling = Total 4 hours 30 mins
- Flavor/Texture Hook: Velvety chocolate mousse with a buttery, shatter crisp base
- Perfect for: Impressing guests without turning on the oven
The smell of melting bittersweet chocolate always hits me first, followed by that sharp, salty scent of melted butter. I remember the first time I tried making a mousse cake; I was convinced I needed packets of gelatin or some fancy stabilizer to stop it from collapsing into a puddle of brown soup.
I spent an entire afternoon worrying about "setting agents" and almost ruined a perfectly good batch of cream by over mixing.
But here is the secret: you don't need gelatin. Forget everything you've heard about needing stabilizers for a firm slice. When you use a high percentage bittersweet chocolate, the cocoa butter does all the heavy lifting for you.
It creates a structural web as it cools, leaving you with a slice that holds its shape but still feels airy.
This easy chocolate mousse cake is all about the contrast. You've got the buttery crunch of the wafer cookies against the silky smooth mousse, topped with a glossy ganache that looks like it came from a boutique bakery.
It's rich, it's decadent, and honestly, it's the only dessert you'll need when you want something that feels expensive but takes zero effort.
Easy Chocolate Mousse Cake Guide
The magic here isn't in a complicated technique, but in how the ingredients interact. To get that velvety texture, we're using a specific ratio of fat to air. If you've ever had a mousse that felt too "foamy" or too "dense," it's usually because the temperature of the chocolate was off when it met the cream.
- Cocoa Butter Set
- High cacao chocolate contains natural fats that solidify when chilled, acting as a natural glue.
- Air Incorporation
- Beating the cream to stiff peaks traps tiny bubbles, which prevents the chocolate from becoming a heavy truffle.
- Salt Balance
- A pinch of salt in the crust cuts through the sugar, making the chocolate taste more intense.
- Temperature Sync
- Cooling the ganache slightly before pouring prevents it from melting the mousse layer below.
If you're wondering whether to go all out or take a shortcut, it really depends on how much time you have. While this recipe is designed for simplicity, a few small changes can shift the vibe from a casual family treat to a dinner party showstopper.
| Feature | Fresh/Premium Approach | Shortcut Approach | Impact on Result |
|---|---|---|---|
| Chocolate | Hand chopped bars | Quality chips | Bars melt smoother; chips can be grainier |
| Vanilla | Vanilla bean paste | Pure extract | Paste adds tiny black specks and deeper flavor |
| Base | Toasted wafer crumbs | store-bought crumbs | Toasting adds a nutty, roasted depth |
Component Analysis
Before we get into the mixing, let's look at why these specific ingredients are in the bowl. Every part of this easy chocolate mousse cake has a job to do. If you swap them blindly, you might end up with a cake that doesn't set or a base that tastes like cardboard.
| Ingredient | Science Role | Pro Secret |
|---|---|---|
| Bittersweet Chocolate (60%) | Structural Agent | Higher cacao % = firmer set and less sugar |
| Heavy Whipping Cream | Aerator & Fat Source | Keep it ice cold for maximum volume |
| Chocolate Wafers | Texture Foundation | Crush them finely to avoid "lumpy" base |
| Unsalted Butter | Moisture Barrier | Prevents the crust from getting soggy |
Shopping List Breakdown
Right then, let's look at what you need. Don't bother with low-fat cream or imitation chocolate here - it'll ruin the texture. You want the real stuff so the mousse stays velvety and doesn't split.
For the Base
- 1.5 cups (180g) chocolate wafer cookies, crushedWhy this? Provides a deep cocoa flavor and a crisp snap
- 5 tbsp (70g) unsalted butter, meltedWhy this? Binds crumbs and adds richness
- 1 pinch (1g) saltWhy this? Balances the sweetness of the cookies
For the Mousse Filling
- 8 oz (225g) bittersweet chocolate (60% cacao), finely choppedWhy this? Essential for the "no gelatin" set
- 2 cups (480ml) heavy whipping cream, divided (1/2 cup for melting, 1.5 cups for whipping)Why this? Creates the light, airy structure
- 2 tbsp (30ml) pure vanilla extractWhy this? Rounds out the bitterness of the cacao
- 1/4 cup (50g) powdered sugar, siftedWhy this? Sweetens without adding grit
For the Ganache Glaze
- 4 oz (115g) semi sweet chocolate, choppedWhy this? Adds a glossy, sweeter finish
- 1/2 cup (120ml) heavy whipping creamWhy this? Emulsifies the chocolate for a smooth pour
- 1 tbsp (14g) unsalted butter, room temperatureWhy this? Gives the glaze a professional shine
If you're missing something, don't panic. Most things can be swapped, but be mindful of the fat content. According to Serious Eats, the type of fat in your chocolate determines how it snaps and melts.
| Original Ingredient | Substitute | Why It Works |
|---|---|---|
| Bittersweet Chocolate | Semi sweet Chocolate | Similar fat. Note: Cake will be sweeter and slightly softer |
| Chocolate Wafers | Graham Crackers + 2 tbsp cocoa | Good crunch. Note: Lacks the intense chocolate punch |
| Heavy Cream | Full fat Coconut Cream | Similar fat content. Note: Adds a tropical coconut flavor |
Must Have Kitchen Tools
You don't need a professional kitchen, but a few specific tools make this a breeze. If you don't have a springform pan, you can use a regular cake pan lined with parchment paper, but getting the cake out becomes a bit of a gamble.
- 8 inch Springform Pan: This is non negotiable for a clean release.
- Electric Hand Mixer: You can whisk by hand, but your arm will regret it. A KitchenAid is great, but a handheld one works perfectly.
- Offset Spatula: Essential for getting that ganache perfectly smooth.
- Rubber Spatula: For the folding process - you don't want to deflate those precious bubbles.
- Fine Mesh Sieve: For sifting the powdered sugar so you don't get white clumps in your chocolate.
The Assembly Process
Let's crack on. This easy chocolate mousse cake happens in three distinct phases. The key is patience; if you rush the cooling, the mousse will melt and you'll end up with a chocolate soup.
Phase 1: Building the Foundation
- Combine crushed cookies, melted butter, and salt in a bowl until the mixture resembles wet sand. Note: Don't overwork it or the butter will separate
- Press the mixture firmly into the bottom of an 8 inch springform pan using the back of a spoon. Press hard to ensure there are no air gaps.
- Chill the base in the freezer for 10 minutes to lock it in place.
Phase 2: Creating the Velvety Filling
- Place chopped bittersweet chocolate in a bowl. Heat 1/2 cup (120ml) of heavy cream until simmering, pour over the chocolate, let sit for 2 minutes, and whisk until glossy and smooth.
- Stir in the vanilla extract and let the chocolate mixture cool to room temperature. Note: If it's too hot, it will melt your whipped cream
- In a separate bowl, beat the remaining 1.5 cups (360ml) of heavy cream and powdered sugar until stiff peaks form. Stop as soon as peaks hold to avoid making butter.
- Gently fold one third of the whipped cream into the cooled chocolate to lighten it, then fold in the remaining cream using a slow, circular motion until no white streaks remain.
- Pour the mousse over the chilled base, smooth the top, and refrigerate for at least 4 hours.
Phase 3: The Final Polish
- Prepare the glaze by heating 1/2 cup (120ml) heavy cream and pouring it over the semi sweet chocolate.
- Stir in the room temperature butter and pour over the chilled cake, smoothing with an offset spatula. Wait for the cake to be fully set before glazing.
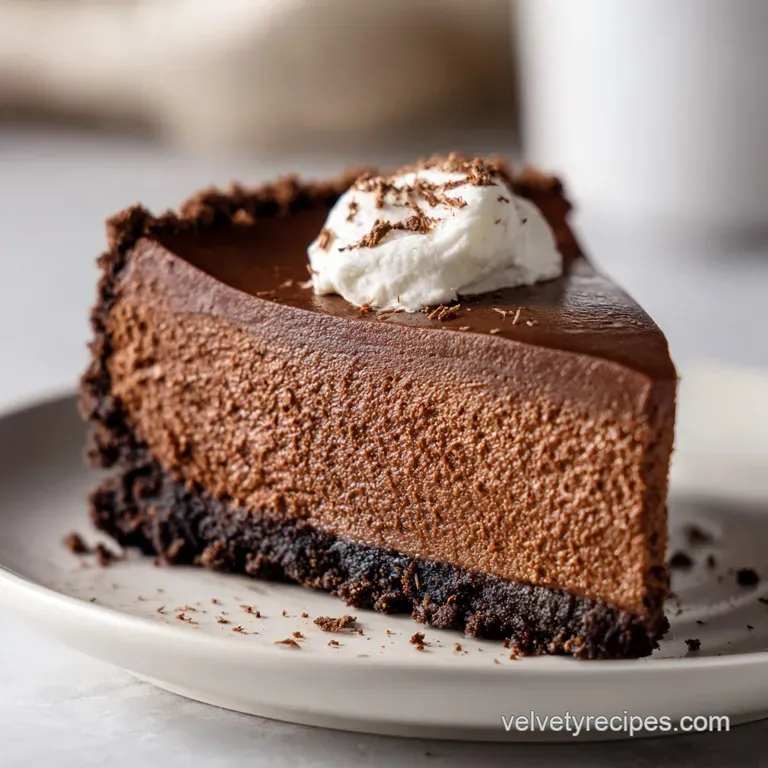
Chef's Tip: To get those perfectly clean slices, dip your knife in hot water and wipe it dry between every single cut. It's a bit tedious, but it makes the cake look professional.
Fixing Mousse Mishaps
Even for a seasoned cook, mousse can be temperamental. Most problems come down to temperature or over mixing. If you've hit a snag, don't throw it out - most of this is fixable.
Troubleshooting Common Issues
| Issue | Solution |
|---|---|
| Why Your Mousse Is Grainy | This usually happens if the chocolate was overheated or if the whipped cream was folded in while the chocolate was still too hot. The fat separates, creating tiny clumps. If it's only slightly grainy, |
| Why Your Base Crumbles | If the crust falls apart when you slice, you likely didn't press it firmly enough into the pan or didn't use enough butter. The butter acts as the glue; without it, you just have loose cookies. Next t |
| Why Your Glaze Is Dull | A dull ganache usually means the butter wasn't incorporated properly or the chocolate was scorched. Ensure your butter is truly at room temperature before stirring it in. This creates the emulsion tha |
Common Mistakes Checklist:
- ✓ Did you sift the powdered sugar? (Prevents lumps)
- ✓ Is the chocolate cooled to room temp? (Prevents mousse collapse)
- ✓ Did you use a "folding" motion, not stirring? (Preserves air)
- ✓ Did you let the cake chill for the full 4 hours? (Ensures a clean slice)
Adjusting Your Batch Size
If you're making this for a tiny date night or a huge party, you can scale it. However, since this is a no bake easy chocolate mousse cake, you have to be careful with the pan dimensions.
Scaling Down (½ batch): Use a 6 inch pan instead of an 8 inch. You'll need to beat one egg (if you were using them, but here just halve the cream). Reduce the chilling time by about 20%, though 3 hours is still safer.
Scaling Up (2x batch): I don't recommend doubling this in one pan because it will take forever to set in the middle. Instead, make two separate 8 inch cakes. If you must use a larger pan, increase the base ingredients by 2.5x to cover the surface area, but keep the filling at 2x.
If you're looking for other desserts to pair with this, you might enjoy a savory contrast. While not a dessert, my Greek Tzatziki sauce is a great palate cleanser after such a rich chocolate treat.
Common Dessert Myths
"You need gelatin for a mousse cake to stand up." Not true. As we've seen with this easy chocolate mousse cake, the cocoa butter in dark chocolate provides plenty of structure. As long as you use a chocolate with at least 60% cacao, it'll set beautifully.
"Dark chocolate is always too bitter for cakes." Actually, the bitterness of dark chocolate is what makes the dessert feel "adult" and sophisticated. When paired with the sweetness of the powdered sugar and the richness of the cream, it creates a balanced flavor that isn't cloying.
"You must use a stand mixer for whipped cream." Nope. A simple hand mixer or even a balloon whisk and some elbow grease will work. The goal is stiff peaks, not the tool you use to get there.
Storage and Zero Waste
This cake keeps remarkably well because the ganache acts as a seal, keeping the mousse from drying out.
Storage Guidelines: Keep the cake in the fridge, covered with a loose dome or plastic wrap, for up to 4 days. I wouldn't recommend leaving it on the counter for more than 2 hours, as the mousse can soften and the cream can spoil.
Freezing Instructions: You can freeze this cake! Wrap it tightly in foil and plastic. It stays good for about 2 months. To thaw, move it to the fridge 24 hours before you want to eat it. Do not thaw at room temperature, or the edges will melt before the center does.
Zero Waste Tips: If you have leftover cookie crumbs, mix them with a bit of melted butter and bake them for 5 minutes to make a quick crumble topping for ice cream. If you have a bit of leftover ganache, drizzle it over some fresh strawberries or stir it into your morning coffee for a mocha vibe. If you enjoy homemade breads and treats, you might also like my English Muffin recipe for your breakfast rotation.
Serving Your Dessert
To really make this easy chocolate mousse cake shine, presentation is everything. Since the cake is so rich, you want a garnish that cuts through the heaviness.
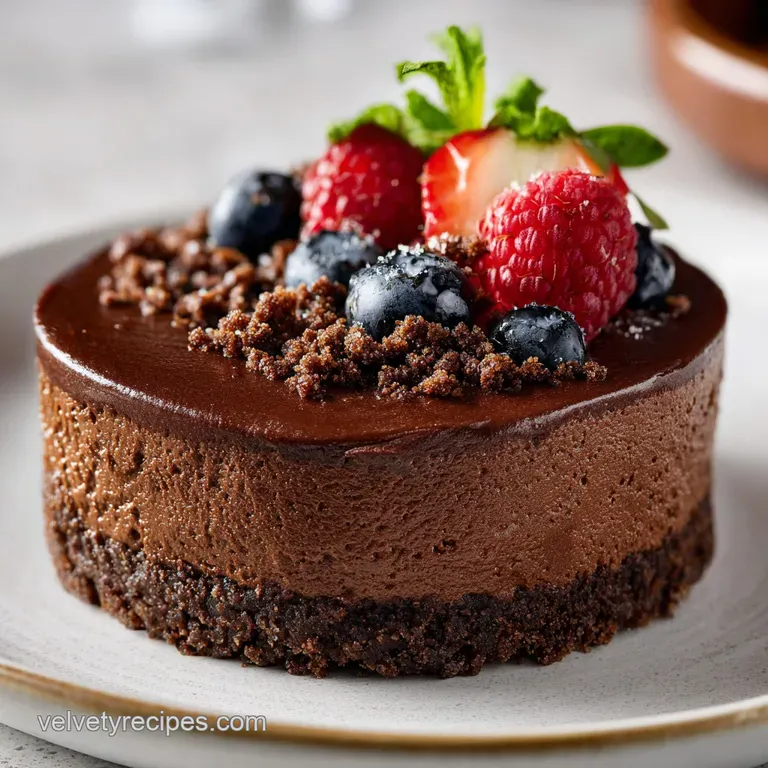
The Perfect Garnish: Fresh raspberries or a sprinkle of flaky sea salt on top of the ganache create a brilliant contrast. A dollop of unsweetened whipped cream on the side also helps balance the intensity of the bittersweet chocolate.
Slicing Technique: As mentioned before, use a hot knife. Dip it in boiling water, wipe it clean, and slice straight down. Don't saw at the cake; just press down firmly. This ensures the mousse doesn't smudge into the cookie base.
Pairing Suggestions: A tart espresso or a glass of cold milk is the classic choice. If you're feeling fancy, a glass of raspberry liqueur or a dry red wine complements the 60% cacao notes perfectly.
Trust me, the salt in the base makes this feel like a professional pastry, but the process is simple enough for any home cook.
Recipe FAQs
How to make chocolate mousse with 3 ingredients?
Heat 1/2 cup heavy cream until simmering, pour over bittersweet chocolate, and fold in whipped cream. This creates a stable, rich mousse using minimal components.
What are the common mistakes when making mousse cake?
Overheating the chocolate or folding in cream while the chocolate is still too hot. This causes the fats to separate, which results in a grainy texture.
How to make chocolate mousse easy with 2 ingredients?
Melt bittersweet chocolate and gently fold in stiff peaked whipped cream. This version omits the extra cream and sugar for a more intense cocoa flavor.
What is the secret to a good mousse?
Fold the whipped cream into the chocolate using a slow, circular motion. This prevents the air bubbles from collapsing, keeping the mousse light and airy.
Why did my mousse cake base crumble when slicing?
The base wasn't pressed firmly enough into the pan. Without a tight press or enough butter, the chocolate wafer cookies will not bond together.
Can I serve this with other desserts?
Yes, this pairs perfectly with salty or fruity snacks. If you enjoyed the balance of textures here, see how we achieve a similar contrast in our caramel pretzel bars.
Is it true that mousse cakes cannot be frozen?
No, this is a common misconception. Wrap the cake tightly in foil and plastic to freeze it for up to 2 months, then thaw in the fridge for 24 hours.
Easy Chocolate Mousse Cake

