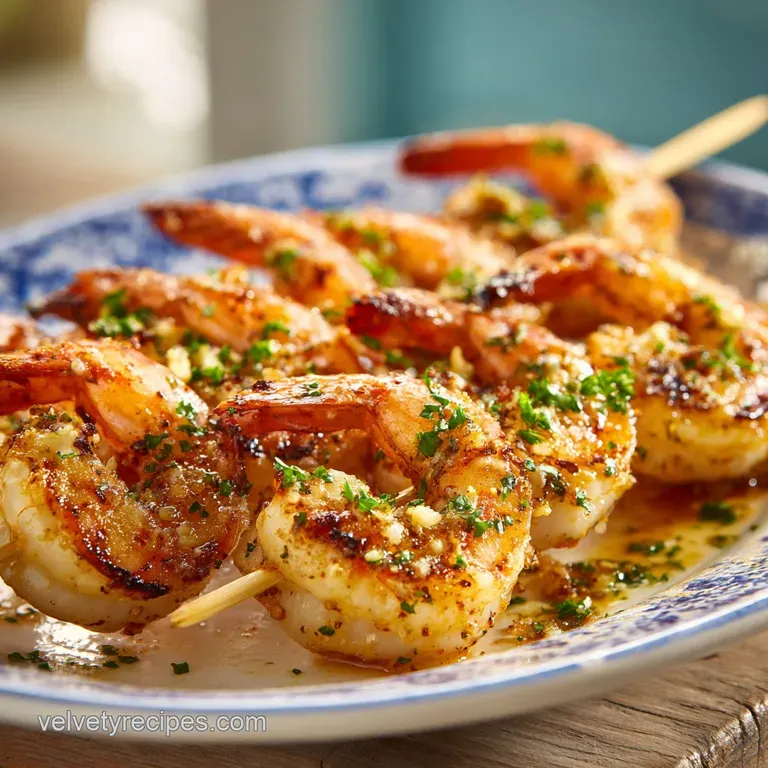
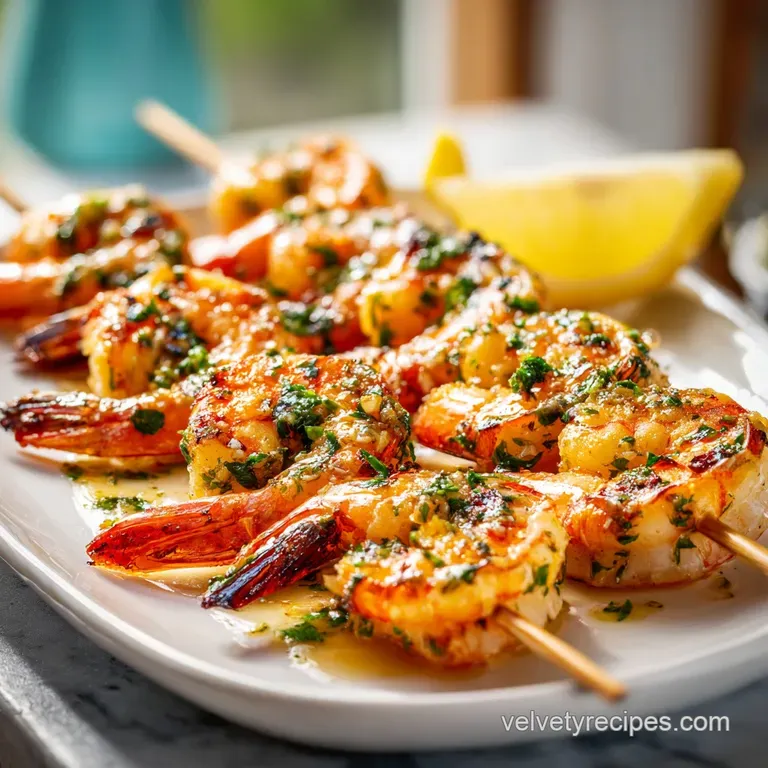
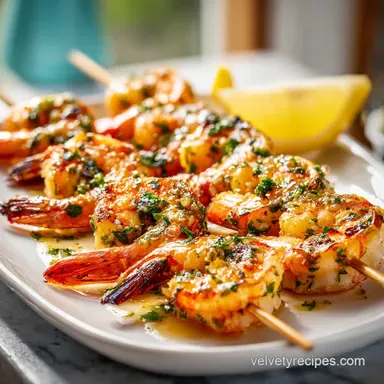
Garlic Butter Shrimp Skewers: Snappy and Charred
- Time: Active 15 minutes, Passive 6 minutes, Total 21 minutes
- Flavor/Texture Hook: Snappy, charred shrimp with a velvety garlic butter finish
- Perfect for: Fast weeknight dinners, summer cookouts, or high protein meal prep
- How to Actually Nail These Garlicky Shrimp Skewers
- Precise Timing for the Most Succulent Results
- Sourcing the Best Components for a Hearty Skewer
- The Essential Tools for Seamless Outdoor Grilling
- Step by Step Guide to Searing and Glazing
- Avoiding Rubbery Texture and Other Kitchen Disasters
- Creative Flavor Twists and Easy Ingredient Swaps
- Safe Storage and Smart Reheating Methods
- Flavorful Pairings for a Million Dollar Dinner
- Recipe FAQs
- 📝 Recipe Card
How to Actually Nail These Garlicky Shrimp Skewers
The first time I attempted making seafood on the grill, I made a massive mistake that I still think about today. I thought more time in the marinade meant more flavor, so I let my shrimp soak in lemon juice and garlic for nearly three hours.
When they hit the grates, there was no satisfying sizzle, just a sad, mushy mess that eventually turned into something resembling a rubber eraser. It was a total disaster, and I ended up ordering pizza while my family looked at the grey, unappetizing skewers with polite concern.
That failure taught me the most important lesson about working with shellfish: precision is your best friend. Shrimp are delicate creatures, and they don't need much to go from raw to snappy and succulent.
If you treat them with a bit of respect and watch the clock, you'll get that gorgeous, charred exterior and a juicy center every single time. This recipe is my tried and true method for fixing all those common pitfalls, from the "spinning shrimp" problem to the bland, watery texture that plagues so many home cooked versions.
We are going for big, bold flavors here. Think smoked paprika for depth, a hint of honey for caramelization, and enough garlic to make things interesting. The aroma of these hitting a hot pan or grill is enough to bring the neighbors over.
We're going to use a double skewer technique that I swear by, which stops the shrimp from twirling around when you try to flip them. It’s a simple trick, but it makes the cooking process so much smoother and ensures even contact with the heat.
Precise Timing for the Most Succulent Results
Protein Denaturation: Acid from the lemon juice begins "cooking" the shrimp's delicate proteins immediately, so staying under 20 minutes prevents a mushy, mealy texture.
Caramelization Boost: The small amount of honey in the final glaze interacts with the high heat to create a deep brown crust without overcooking the interior.
Heat Retention: Using two parallel skewers increases the surface area contact and stabilizes the ingredients, allowing for a faster, harder sear that locks in moisture.
Fat Based Insulation: The olive oil in the marinade creates a thin barrier that protects the shrimp from drying out too quickly under intense heat.
| Method | Cook Time | Texture Outcome | Best For |
|---|---|---|---|
| Outdoor Grill | 6 minutes | Deeply charred and smoky | Summer entertaining |
| Cast Iron Pan | 6 minutes | Evenly browned and very juicy | Year round weeknight meals |
| Air Fryer | 8 minutes | Slightly firmer and very snappy | Hands off quick prep |
The choice of cooking method really depends on your mood and the weather. I personally love the cast iron pan for these because you can really control the temperature and ensure the garlic doesn't burn. If you are using an outdoor grill, just make sure those grates are screaming hot before the skewers touch them.
Sourcing the Best Components for a Hearty Skewer
| Component | Science Role | Pro Secret |
|---|---|---|
| Jumbo Shrimp (16/20) | Main Protein | Buy "shell on" and peel them yourself for better moisture retention and flavor. |
| Smoked Paprika | Flavor Compound | high-quality Spanish pimentón adds a "grilled" taste even if you use a stovetop pan. |
| Fresh Lemon Juice | Acid Catalyst | Always zest the lemon before juicing; the oils in the zest provide a brighter punch. |
| Unsalted Butter | Emulsifier | Adding this at the very end creates a "velvety" mouthfeel that oil alone cannot achieve. |
When you're at the store, look for shrimp that are firm to the touch and smell like the ocean, not like ammonia. I always go for the 16/20 count, which means there are about 16 to 20 shrimp per pound. These are large enough to stay juicy while the vegetables on the skewer get that nice char.
If you use smaller shrimp, they will turn into rubber before the onions even think about softening up.
The Essential Tools for Seamless Outdoor Grilling
To get these right, you don't need a professional kitchen, but a few specific items make the job much easier. If you're using wooden skewers, you absolutely must soak them in water for at least 30 minutes before threading. I've seen too many skewers turn into kindling halfway through the cook.
Metal skewers are a great investment if you plan on making these often, as they conduct heat into the center of the shrimp, helping them cook more evenly from the inside out.
A solid pair of long handled tongs is also non negotiable. You want to be able to flip the skewers quickly without getting your hands too close to the heat. I also highly recommend using a small pastry brush for the final glaze.
Brushing the honey butter mixture on in the last 30 seconds is what gives these that "million dollars" look. If you don't have a grill, a heavy cast iron skillet is the next best thing. It holds heat beautifully and gives you that restaurant quality sear that a non stick pan just can't manage.
The Critical 15 Minute Marinating Window
Don't be tempted to let the shrimp sit in the lemon and garlic mixture while you go run errands. Shrimp are mostly water and protein; the acid in the lemon juice will literally start to break down the structure of the meat.
After 15 minutes, the flavors have penetrated the surface, but the shrimp still has its snappy bite. Any longer and you're entering "ceviche" territory, which isn't what we want for a hot skewer.
Benefits of the Double Skewering Technique
If you've ever tried to flip a skewer and had the shrimp just spin in place while the stick turns, you know the frustration. By using two skewers parallel to each other (about half an inch apart), you create a "ladder" that locks the shrimp and vegetables in place.
This allows you to press the skewers down firmly against the grill or pan, ensuring every single piece gets that beautiful brown color.
Finishing with Cold Butter for Texture
While the recipe calls for melted butter in the glaze, I sometimes use very cold butter whisked into the warm honey and parsley. This creates a bit of an emulsion, making the sauce thicker and more likely to cling to the shrimp rather than just dripping off into the coals.
It’s a small detail, but it makes a massive difference in how the final dish feels when you take that first bite.
step-by-step Guide to Searing and Glazing
- Whisk the marinade. In a large glass bowl, combine 3 tbsp Extra Virgin Olive Oil, 1 tbsp lemon juice, 4 cloves of minced garlic paste, 1 tsp smoked paprika, 1/2 tsp dried oregano, 1/2 tsp red pepper flakes, 1 tsp kosher salt, and 1/2 tsp cracked black pepper. Note: Using a glass bowl prevents any metallic reaction with the lemon juice.
- Prep the shrimp. Pat 1.5 lbs of jumbo shrimp completely dry with paper towels. Note: Moisture is the enemy of a good sear; if they are wet, they will steam instead of browning.
- Marinate the components. Toss the dry shrimp, red bell pepper squares, red onion petals, and zucchini rounds into the marinade bowl. Set a timer for exactly 15 minutes.
- Thread the skewers. Using the double skewer method, alternate between shrimp and vegetables. Ensure they are packed snugly but not smashed together.
- Preheat the surface. Get your grill or cast iron pan to medium high heat. You should see a faint wispy smoke coming off the surface.
- Start the sear. Place the skewers down and press gently with your tongs. Cook for 3 minutes without moving them. Until the edges turn pink and the bottoms are charred.
- The flip. Carefully turn the skewers over. Cook for another 2 to 3 minutes on the second side. Until the shrimp are opaque all the way through.
- Prepare the glaze. While the second side cooks, quickly whisk 3 tbsp melted unsalted butter with 1 tbsp chopped parsley and 1/2 tsp honey.
- The final touch. In the last 30 seconds of cooking, brush the glaze generously over both sides of the skewers. Until the butter sizzles and smells nutty.
- Rest and serve. Remove from heat and let them sit for 2 minutes before serving. This lets the juices redistribute so they don't all run out on the plate.
Avoiding Rubbery Texture and Other Kitchen Disasters
The most common issue with Shrimp Skewers is overcooking. Shrimp are finished when they form a "C" shape. If they've curled into a tight "O," you've gone too far, and they will likely be tough.
Keeping a close eye on the color change from greyish translucent to opaque pearly white is your best indicator. Also, make sure your vegetables are cut to the right size. If the zucchini is too thick, it will be raw while the shrimp are done.
I find that half inch rounds for the zucchini and one inch squares for the peppers are the "sweet spot" for even cooking.
Solutions for Rubbery or Tough Shrimp
If you find your shrimp are consistently tough, check your heat source. Often, home cooks use heat that is too low, which means the shrimp have to sit in the pan longer to get any color. This slow cooking dries out the interior. Crank up the heat! You want a fast, aggressive sear.
Also, ensure you are using "jumbo" shrimp. Smaller varieties are much less forgiving and can overcook in a matter of seconds.
Preventing Bitter Burnt Garlic Flavors
Garlic burns much faster than shrimp cooks. This is why we mince it into a paste rather than leaving big chunks. The paste incorporates into the oil and coats the shrimp, protecting it from direct contact with the hot surface.
If you see the garlic turning dark brown or black, turn the heat down slightly or move the skewers to a cooler part of the grill.
Alternative Methods for Indoor Cooking
If it’s raining outside, don't worry. You can achieve great results using a broiler. Place the prepared skewers on a wire rack over a baking sheet and slide them under the broiler for about 3-4 minutes per side. It mimics the intense overhead heat of a grill perfectly.
Just keep a very close eye on them, as broilers can be unpredictable.
| Problem | Root Cause | Solution |
|---|---|---|
| Shrimp are mushy | Over marinating in acid | Limit lemon juice exposure to 15-20 minutes max. |
| Veggies are raw | Pieces cut too thick | Slice zucchini to 1/2 inch and peppers to 1 inch. |
| Shrimp are dry | Heat was too low | Increase heat to medium high for a faster sear. |
Common Mistakes Checklist
- ✓ Forgetting to pat the shrimp dry (results in grey, boiled looking seafood).
- ✓ Using only one skewer per row (leads to spinning and uneven cooking).
- ✓ Adding the honey butter glaze too early (the sugar will burn before the shrimp is done).
- ✓ Overcrowding the pan (drops the temperature and prevents charring).
- ✓ Skimping on the salt (shrimp needs a decent amount of seasoning to shine).
Creative Flavor Twists and Easy Ingredient Swaps
I love the classic garlic butter profile, but these skewers are incredibly versatile. You can easily swap out the oregano and paprika for a teaspoon of cumin and chili powder if you're serving these alongside my fresh taco slaw. The crunch of the cabbage and the acidity of the lime in the slaw provide a brilliant contrast to the rich, buttery shrimp.
If you want a more substantial meal, you can pull the shrimp off the skewers after cooking and toss them into a garlic butter linguine. The juices from the charred vegetables and the honey butter glaze create an instant sauce for the pasta. It’s one of my favorite ways to use up leftovers or to turn a simple appetizer into a filling family dinner that looks like it cost fifty dollars at a bistro.
| Original Ingredient | Substitute | Why It Works |
|---|---|---|
| Red Onion | Shallots | Provides a milder, sweeter onion flavor that caramelizes beautifully. |
| Zucchini | Yellow Squash | Similar texture and moisture content; adds a nice pop of color. |
| Smoked Paprika | Chipotle Powder | Adds a much stronger spicy kick and deeper smoky notes. |
Safe Storage and Smart Reheating Methods
Shrimp is one of those things that is truly best eaten fresh, but if you have leftovers, they will keep in the fridge for up to 2 days. Store them in an airtight container as soon as they reach room temperature. To prevent them from becoming rubbery when reheating, avoid the microwave at all costs.
Instead, toss them in a hot skillet with a splash of water or a tiny knob of butter for about 60 seconds just to take the chill off.
For long term storage, you can freeze the marinated (but uncooked) shrimp and vegetables for up to 2 months. Just make sure to squeeze all the air out of the freezer bag to prevent freezer burn. When you're ready to cook, thaw them overnight in the fridge.
Do not freeze them after they are cooked, as the texture of both the shrimp and the zucchini will become unpleasantly soft and watery upon thawing.
If you find yourself with just a few leftover shrimp and some charred veggies, don't throw them away! I love chopping them up and adding them to an omelet the next morning. The smoky paprika and garlic flavors are already built in, so you don't even need to season the eggs much.
It’s a zero waste way to enjoy a gourmet breakfast.
Flavorful Pairings for a Million Dollar Dinner
When I'm serving these for friends, I usually go for a spread that feels light and fresh. A big bowl of coconut rice or a simple quinoa salad with lots of fresh herbs works beautifully. The sweetness of the coconut rice particularly complements the smoky char on the shrimp.
If you’re keeping things low carb, a simple green salad with a sharp vinaigrette is all you need to balance out the richness of the garlic butter glaze.
Another great option is to serve these with a side of grilled corn on the cob. Since you already have the grill going, it’s an easy addition. Just brush the corn with a little bit of the same garlic butter you used for the shrimp. It ties the whole meal together and makes it feel like a cohesive, thoughtful menu.
Trust me, once you master the timing on these skewers, they will become a permanent part of your cooking rotation. They're fast, healthy, and honestly, they just make the dinner table feel a little more special.
Don't be afraid to experiment with the vegetable choices too. Cherry tomatoes are a fantastic addition because they burst and create their own little sauce, but be warned they can be messy! Pineapple chunks are another favorite of mine if I'm going for a more tropical vibe.
The fruit sugars caramelize even faster than the honey, giving you those gorgeous dark grill marks that everyone loves to see. Right then, let's get that grill preheated!

Recipe FAQs
What goes with shrimp on a skewer?
Use bell peppers, red onion, and zucchini. These vegetables hold up well to the high heat and soak up the marinade while keeping the skewers colorful and balanced in texture.
What is a good marinade for shrimp skewers?
Whisk olive oil, lemon juice, garlic, smoked paprika, oregano, and red pepper flakes. This combination creates a savory, aromatic base that highlights the sweetness of the shrimp without overpowering it.
How long do you cook shrimp kabobs?
Cook for approximately 3 minutes per side over medium high heat. You are aiming for the shrimp to turn opaque and develop a slight char, which indicates they are perfectly cooked through.
How to properly skewer shrimp?
Thread the shrimp and vegetables using two parallel skewers for each row. This technique prevents the ingredients from spinning when you turn them and ensures every piece maintains even contact with the heat source.
Is it true I can marinate shrimp as long as I want for more flavor?
No, this is a common misconception. You must limit marination to 15-20 minutes; any longer and the lemon juice will cause the protein to denature, resulting in a mushy, undesirable texture.
How to ensure the shrimp get a nice golden crust?
Pat the shrimp completely dry with paper towels before tossing them in the marinade. Excess moisture is the enemy of a good sear, as wet shrimp will steam rather than brown. If you enjoyed perfecting this sear, you can apply the same principle of moisture control to our other high heat protein recipes.
How to apply the honey butter glaze without burning it?
Brush the glaze onto the skewers only in the final 30 seconds of cooking. Since the glaze contains honey and butter, adding it too early causes the sugars to scorch before the shrimp are fully cooked.
Garlic Butter Shrimp Skewers
Ingredients:
Instructions:
Nutrition Facts:
| Calories | 353 calories |
|---|---|
| Protein | 34.8 g |
| Fat | 20.4 g |
| Carbs | 9.2 g |
| Fiber | 2.1 g |
| Sugar | 4.1 g |
| Sodium | 740 mg |
