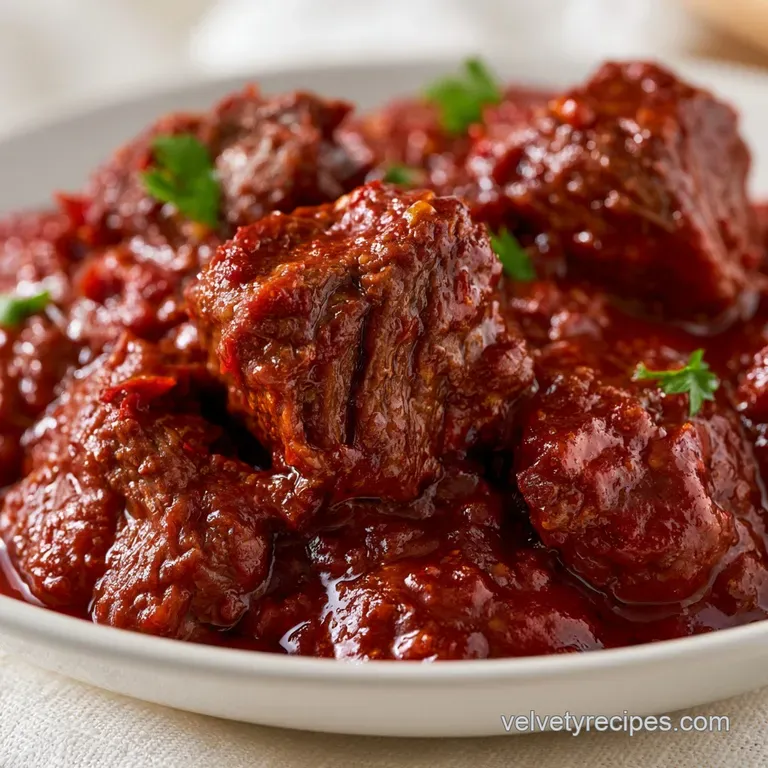
Chili Colorado: Authentic and Tender
- Time: 25 min active + 120 min simmering = Total 145 min
- Flavor/Texture Hook: Mahogany sauce with tender, fork split pork
- Perfect for: Hearty Sunday family dinners or meal prep
- The Real Way to Make Chili Colorado
- Deep Dive into the Ingredients
- Gathering Your Essentials
- The Essential Cooking Gear
- Step by Step Cooking Flow
- Fixing Common Sauce Mistakes
- Troubleshooting Common Issues
- Customizing Your Flavor Profile
- Adjusting for Different Crowd Sizes
- Debunking Common Meat Myths
- Keeping Leftovers Fresh
- Best Ways to Serve it
- Recipe FAQs
- 📝 Recipe Card
The smell of toasted dried chiles is something you never forget. It starts as a faint, smoky scent and then, within seconds, it fills the kitchen with this deep, earthy aroma that tells you something special is happening.
I remember the first time I tried to make this for a family get together, I rushed the toast and ended up with a sauce that tasted burnt. Now, I treat those chiles with total respect, watching them just until they're fragrant, not blackened.
When you get this right, the pork doesn't just cook, it transforms. It goes from a tough, marbled slab of shoulder to something that practically melts the moment it hits your tongue.
This is the kind of meal that makes the whole house feel warm, especially when you can see that thick, velvety red sauce bubbling away in the Dutch oven for a couple of hours.
You're going to end up with a dish that's rich, savory, and has a heat that glows rather than burns. Whether you're making this for a big party or just want some killer leftovers for the week, this Chili Colorado is the real deal.
Trust me, your house is going to smell like a professional kitchen by the time you're done.
The Real Way to Make Chili Colorado
Right then, let's get into why this actually works. Most people think any red sauce will do, but the secret is in how we treat the dried pods. We aren't just boiling them; we're unlocking flavors through heat and hydration.
The Secrets Behind the Sauce
- Dry Toasting: Heating the chiles in a skillet wakes up the essential oils, making the flavor deep and nutty instead of just "hot".
- Hydration Soak: Boiling water softens the tough skins, allowing the blender to create a velvety texture without leaving gritty bits.
- Collagen Breakdown: Simmering the pork shoulder for 2 hours converts tough connective tissue into gelatin, which thickens the sauce naturally.
- Fat Integration: Using lard for the sear and butter at the end adds a layer of richness that balances the acidity of the chiles.
But what about the texture? If you use a lean cut of meat, you'll end up with something dry and disappointing. We use pork shoulder because the fat renders down into the sauce, creating a glossy finish. According to USDA FoodData, pork shoulder has the ideal fat to protein ratio for long term braising, ensuring the meat stays moist even after two hours of heat.
| Method | Prep Time | Texture | Best For |
|---|---|---|---|
| Fresh Chiles | 45 mins | Brighter, sharper | Summer harvests |
| Dried Chiles | 25 mins | Deep, smoky, rich | Classic authenticity |
| Canned Paste | 10 mins | Flat, metallic | Ultra quick weeknights |
By sticking to the dried chiles, you get that characteristic mahogany hue that defines an authentic Chili Colorado. It's a bit more work, but the difference in depth is massive.
Deep Dive into the Ingredients
Not all ingredients are created equal here. The combination of Guajillo and Ancho is what gives us the base, while the árbol provides the kick. If you've ever wondered why some versions taste like plain tomato sauce, it's because they skipped the diverse chile blend.
| Ingredient | Science Role | Pro Secret |
|---|---|---|
| Guajillo Chiles | Color and tang | Remove seeds for a smoother, milder heat |
| Ancho Chiles | Sweetness and body | Soak in the actual cooking stock for extra flavor |
| Pork Shoulder | Structure and fat | Cut into exact 1.5 inch cubes for even cooking |
| Lard | Searing medium | High smoke point prevents the meat from sticking |
Since we're going for a hearty, home cook feel, I really recommend using lard. If you don't have any, vegetable oil works, but lard gives it that "million dollars" taste. Also, don't be afraid of the butter at the end. It's a French technique called monter au beurre, which gives the sauce a professional gloss.
Gathering Your Essentials
Let's talk about what you actually need on your counter. Make sure your pork is patted dry; if it's wet, it will steam instead of sear, and you'll miss out on that deep golden crust.
For the Red Chili Sauce
- 5 dried Guajillo chiles, stems and seeds removedWhy this? Provides the signature red color and mild tang
- 3 dried Ancho chiles, stems and seeds removedWhy this? Adds a rich, raisin like sweetness
- 2 dried chiles de árbolWhy this? This is where the actual heat comes from
- 3 cups chicken stockWhy this? Better depth than water for the base
- 4 cloves garlic, peeledWhy this? Essential aromatic base
- 1 medium white onion, quarteredWhy this? Adds subtle sweetness and thickness
- 1 tsp ground cuminWhy this? Earthy notes that complement the chiles
- 1 tsp dried oreganoWhy this? Floral contrast to the heavy meat
- 2 tbsp vegetable oilWhy this? For the initial chile toast
For the Pork
- 3 lbs pork shoulder, cut into 1.5 inch cubesWhy this? High fat content keeps it tender
- 2 tbsp vegetable oil (extra)Why this? Backup if lard isn't used
- 1 tsp saltWhy this? Enhances all other flavors
- 1/2 tsp black pepperWhy this? Basic seasoning for the meat
- 2 tbsp lardWhy this? Superior sear and traditional flavor
For the Finishing Touches - 1 tbsp butter Why this? For a velvety, glossy finish - Fresh cilantro for garnish Why this? Freshness to cut through the richness
Chef's Note: If you can't find Guajillo chiles, you can use a mix of New Mexico chiles, but the color will be slightly more orange than the deep red we want for this Chili Colorado.
The Essential Cooking Gear
You don't need a fancy kitchen, but a few specific tools make this way easier. A heavy bottomed pot is non negotiable here because we're simmering for two hours, and thin pots will scorch the sauce.
I always use a Dutch oven. Whether it's cast iron or enameled, the way it holds heat is brilliant for braising. You'll also need a high speed blender. If your blender struggles, you'll end up with bits of chile skin in your sauce, which isn't the end of the world, but it's not as velvety.
Finally,, have a fine mesh strainer ready. I once skipped this step and the sauce had these tiny, papery flakes of chile skin that were a bit distracting. Straining it makes the dish feel like it came from a high end restaurant.
Step by step Cooking Flow
Let's crack on with the cooking. I've broken this down into the prep flow and the actual heat. Remember to keep your heat medium; we want to coax the flavor out, not burn it.
Phase 1: Crafting the Mahogany Sauce 1. Toast the dried Guajillo, Ancho, and árbol chiles in a dry skillet over medium heat for 30-60 seconds per side until they smell fragrant and nutty. Note: Don't walk away; they can burn in seconds. 2.
Place toasted chiles in a bowl of boiling water for 15 minutes until they are soft and pliable. 3. Transfer softened chiles to a blender and add garlic, quartered onion, cumin, oregano, and chicken stock. Blend on high until the mixture is velvety smooth. 4.
Pour the sauce through a fine mesh strainer into a bowl until no large chunks remain. Note: Use a spoon to push the sauce through the mesh.
Phase 2: Searing and Braising the Pork 5. Pat the pork shoulder cubes dry with paper towels and season generously with salt and pepper. Note: Dry meat sears better. 6. Heat lard or oil in a Dutch oven over medium high heat.
Sear the pork in batches until a deep golden brown crust forms on all sides, then remove meat and set aside. 7. Pour the prepared red chili sauce into the pot, scraping the bottom with a wooden spoon until all the browned bits (fond) are dissolved.
Note: This is where the most flavor lives. 8. Return the pork to the pot. Lower heat to a simmer, cover, and cook for 1.5 to 2 hours until the pork is tender and pulls apart easily with a fork.
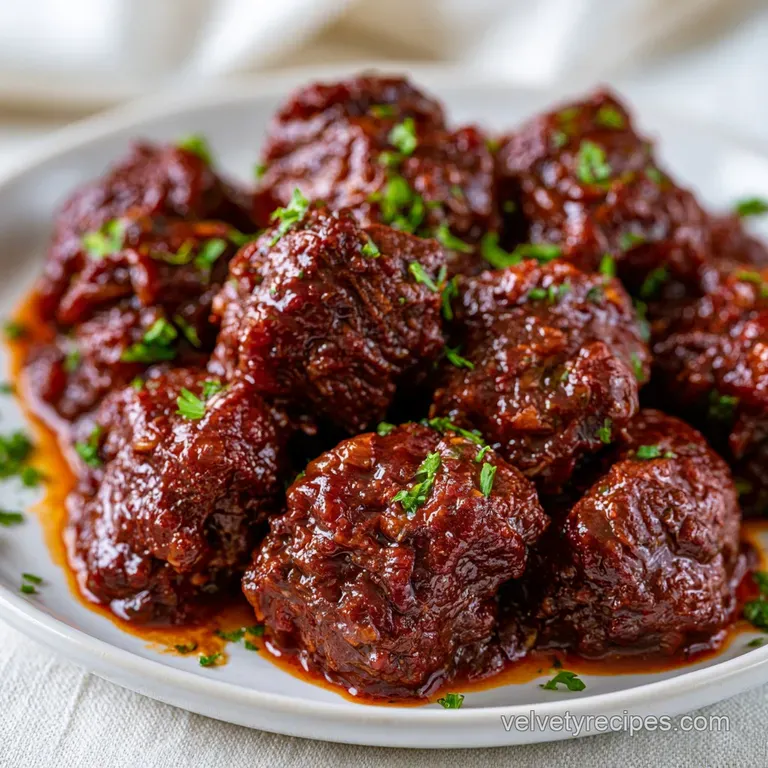
Phase 3: The Final Reduction 9. Stir in the butter until it is fully melted and the sauce looks glossy. 10. Garnish with fresh cilantro before serving.
Fixing Common Sauce Mistakes
Even seasoned cooks hit a snag with Chili Colorado. Usually, it comes down to the balance of the chiles or the temperature of the braise.
Troubleshooting Common Issues
| Issue | Solution |
|---|---|
| Why Your Sauce Is Too Bitter | This usually happens if the dried chiles were toasted too long. When the sugars in the chile pods burn, they turn acrid. If this happens, a pinch of brown sugar or a tiny bit of honey can neutralize t |
| Why the Meat is Tough | Tough meat is almost always a result of rushing the simmer. If you try to finish the dish in 60 minutes, the collagen hasn't had time to melt. Just put the lid back on and give it another 30 minutes. |
| Why the Sauce is Too Thin | If your sauce looks more like a soup than a glaze, you probably didn't sear the meat enough or you added too much stock. You can fix this by simmering with the lid off for the last 20 minutes to let t |
Common Mistakes Checklist
- ✓ Did you pat the pork dry before searing? (Prevents steaming)
- ✓ Did you strain the sauce? (Ensures velvety texture)
- ✓ Did you sear in batches? (Prevents crowding and gray meat)
- ✓ Did you use a low simmer? (Prevents toughening the protein)
- ✓ Did you remove chile seeds? (Controls the heat level)
Customizing Your Flavor Profile
One of the best things about this Chili Colorado is how it adapts to your taste. If you like it hotter, just add another chile de árbol to the blender. If you prefer something more mellow, increase the number of Ancho chiles.
If you're serving this for a crowd, a side of Mexican Chicken Rice is the way to go. The rice soaks up that mahogany sauce, making the meal feel complete.
2 Flavor Twists - Chocolate Touch: Stir in a small piece of Mexican chocolate (like Abuelita) at the end. It adds a dark, earthy richness that plays well with the chiles.
- Apple Cider Vinegar: A splash of vinegar right before serving brightens the whole dish and cuts through the fat of the pork shoulder.
2 Diet Swaps - Leaner Protein: You can use beef chuck roast instead of pork. It works similarly because it's also a tough cut that needs a long braise. - Oil Swap: If you don't like lard, avocado oil is a great substitute because of its high smoke point.
Adjusting for Different Crowd Sizes
Scaling a braise is a bit different than scaling a cake. You can't just multiply everything by four and expect the same result, as the liquid doesn't evaporate at the same rate in a larger pot.
Scaling Down (Half Batch) If you're cooking for 4 people, use 1.5 lbs of pork and 1.5 cups of stock. Use a smaller pot so the meat isn't swimming in liquid. Reduce the simmering time by about 20%, as smaller chunks of meat often cook faster.
Scaling Up (Double Batch) For a party of 16, double the meat and chiles, but only increase the stock to about 5 cups instead of 6. The meat will release its own juices, and too much liquid will make the sauce thin. Most importantly, sear the pork in 4-5 batches.
If you crowd the pan, the meat will boil in its own juices and you'll lose that essential crust.
If you find yourself making huge batches, you might consider a slow cooker. While the stove is my favorite, a crockpot chili colorado is great for busy days. Just sear the meat first on the stove, then throw everything in the slow cooker on low for 8 hours.
Debunking Common Meat Myths
There's a lot of bad advice out there about braising. Let's clear a few things up so you can cook with confidence.
The "Sealing In Juices" Myth You've probably heard that searing meat "seals in" the juices. That's simply not true. Searing actually causes moisture loss on the surface. The reason we do it for this Chili Colorado is for the flavor.
The browned crust adds a complex, savory depth that you just can't get from boiling.
The "Low and Slow" Rule While "low and slow" is the general vibe, you can't go too low. If the liquid is barely warm, the collagen won't break down properly, and you'll end up with meat that is both dry and tough. You want a steady, gentle bubble.
Keeping Leftovers Fresh
This dish is actually better the next day. The flavors have time to mingle and settle, and the sauce often thickens up beautifully in the fridge.
Storage Guidelines
- Fridge: Store in an airtight container for up to 4 days.
- Freezer: This freezes incredibly well. Store in freezer safe bags for up to 3 months.
- Reheating: Heat gently on the stove over medium low. If the sauce has become too thick, stir in a tablespoon of water or chicken stock to loosen it up.
Zero Waste Tips Don't throw away the leftover chicken stock if you didn't use it all for the sauce. You can freeze it in ice cube trays to use for deglazing pans later. If you have leftover pork but no sauce, shred the meat and use it for a chili colorado burrito.
Just add some fresh avocado and pickled onions to brighten it up.
Best Ways to Serve it
The way you serve this impacts the whole experience. Because the sauce is so rich, you need sides that provide a bit of acidity or a neutral base to balance it out.
For a lighter appetizer before this hearty meal, maybe try some Garlic Butter Shrimp Skewers. The charred garlic complements the smokiness of the chiles without filling everyone up before the main event.
Serving Ideas
- Classic Style: Serve in a shallow bowl over a bed of steamed white rice or with warm corn tortillas.
- The Burrito Way: Scoop the meat and sauce into a large flour tortilla with refried beans and shredded cheese.
- Modern Twist: Serve it over creamy polenta or mashed potatoes for a fusion comfort meal.
Honestly, the best way to enjoy Chili Colorado is with a cold drink and some good company. It's a dish that encourages people to linger at the table, passing around the tortillas and scraping every last bit of that velvety sauce from the bowl.
Once you've mastered the art of the toasted chile and the slow braise, you'll realize that this isn't just a recipe, it's a technique you can use for all sorts of red stews. Just remember to be patient with the meat and generous with the lard, and you'll have a meal that tastes like a million dollars every single time.
Let's get cooking!
Recipe FAQs
What is Chile Colorado made of?
Pork shoulder simmered in a rich red chili sauce. The sauce is crafted from toasted Guajillo, Ancho, and árbol chiles blended with garlic, onion, cumin, oregano, and chicken stock.
What's the secret to a great Chili Colorado?
Properly toasting the dried chiles and searing the meat. Toasting the pods for 30-60 seconds unlocks nutty aromas, while searing pork shoulder in lard creates a deep flavor base. If you enjoyed mastering the searing process here, see how the same principle works in our hibachi chicken.
What is the difference between chili con carne and Chili Colorado?
The primary difference is the sauce and cut of meat. Chili con carne is typically a thicker stew often using ground beef, whereas Chili Colorado features cubed pork shoulder in a smooth, strained sauce made from specific dried red chiles.
What's the difference between Chili Colorado and Chile Verde?
The color and the type of chiles used. Colorado uses dried red chiles for a deep mahogany hue, while Verde uses green chiles and tomatillos for a bright, tangy profile.
Why is my sauce bitter?
The dried chiles were likely toasted too long. When the sugars in the chile pods burn, they become acrid. Limit toasting to 30-60 seconds per side to avoid this.
Why is the pork still tough?
The meat has not simmered long enough. Collagen requires time to break down, so rushing the process results in tough meat. Return the lid and simmer for another 30 minutes.
How to ensure the sauce is velvety smooth?
Pour the blended sauce through a fine mesh strainer. This critical step removes remaining pieces of chile skin and seeds before the sauce enters the Dutch oven.
Authentic Chili Colorado

