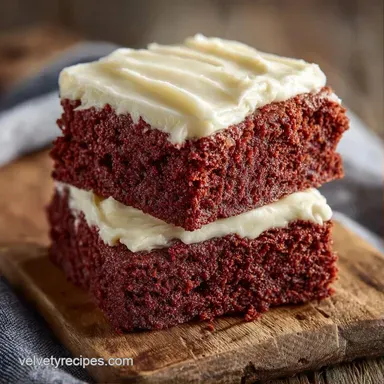
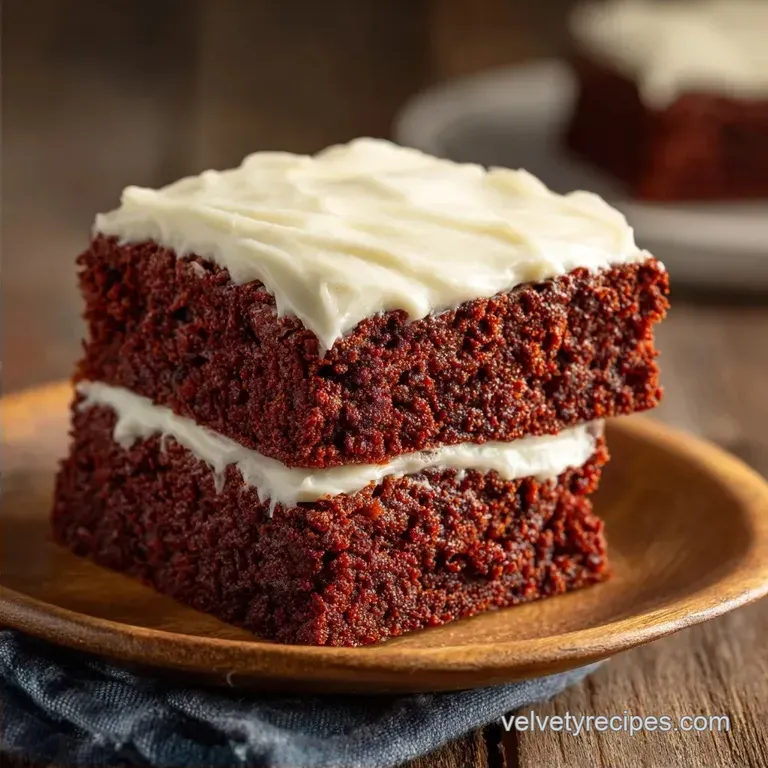
Red Velvet Brownies: Fudgy and Rich
- Time: 10 min active + 1 hour 30 mins cooling/baking
- Flavor/Texture Hook: Fudgy, deep cocoa base with a tangy cream cheese topping
- Perfect for: Valentine's Day or a quick weekend treat
- Baking Fudgy Red Velvet Brownies
- Why Most Recipes Fail
- Recipe Specs and Times
- Shopping List Breakdown
- Essential Gear Needed
- Steps for Best Results
- Fixing Common Baking Errors
- Swaps and Creative Twists
- Scaling Guidelines
- Red Velvet Truths
- Storage and Waste Tips
- Ways to Serve These
- Recipe FAQs
- 📝 Recipe Card
The smell of cocoa powder and warm vanilla hitting the air is the best part of this process. I remember the first time I tried these, I was so excited that I frosted them while they were still warm. The cream cheese topping basically turned into a puddle.
It was a mess, but it taught me that patience is the only way to get those clean, sharp edges on a brownie bar.
You can get these in the oven in ten minutes, but the real payoff is in the texture. We're going for a heavy, chewy bite that feels more like a cookie bar than a slice of cake.
If you love this vibe, you'll find that Red Velvet Brownies are the middle ground between a decadent truffle and a classic brownie. They have that iconic look and a flavor that actually tastes like chocolate.
Baking Fudgy Red Velvet Brownies
Airy Eggs: Beating the eggs and sugar for a full minute creates a stable structure that keeps the brownies from becoming a brick.
Gel Coloring: Using gel instead of liquid keeps the batter thick so the Red Velvet Brownies don't get too runny or lose their color.
Full Cooling: Letting the base reach room temperature prevents the frosting from melting into the cake.
| Style | Prep Time | Texture | Best For |
|---|---|---|---|
| Fast Method | 10 mins | Slightly softer | Quick cravings |
| Classic Bake | 15 mins | More structured | Parties/Gifting |
Right then, let's look at what's actually happening in the bowl.
Why Most Recipes Fail
Many versions of this treat end up tasting like red colored cake. This usually happens because they add too much baking soda or over mix the flour, which develops too much gluten. For a real brownie, you want a dense, fudgy crumb that clings to your teeth.
Another common issue is the color. Some people use liquid food coloring from the grocery store, but that adds too much water. According to King Arthur Baking, the quality of your cocoa powder also changes the base color, which is why we use a specific amount of cocoa to balance the red.
The Cakey Trap
If you whisk the flour in too aggressively, you're basically making a cake. Fold it in gently with a spatula. You want to see just a few streaks of flour before you stop.
The Coloring Conflict
Red dye can sometimes have a bitter aftertaste if you use too much. Gel is more concentrated, so a tablespoon gives you a deep crimson without ruining the flavor of the Red Velvet Brownies.
Recipe Specs and Times
The timing here is non negotiable. While the active work is fast, the total time includes the cooling period. If you skip the cool down, the frosting will slide right off.
- Prep time: 10 minutes
- Cook time: 30 minutes
- Total time: 1 hour 40 minutes
- Yield: 12 brownies
- Pan size: 8x8 inch
Shopping List Breakdown
The trick to the flavor is the balance between the cocoa and the cream cheese. Don't use low-fat cream cheese here, as it's more likely to separate and make the frosting runny.
| Ingredient | What It Does | Best Swap |
|---|---|---|
| Unsalted Butter | Provides the chewy fat | Coconut oil (melted) |
| Cocoa Powder | Adds the chocolate base | Dutch processed cocoa |
| Red Gel Color | Gives the iconic look | Beet powder (less vibrant) |
| Cream Cheese | Adds the tangy contrast | Mascarpone (richer) |
Brownie Base:
- 1/2 cup (115g) unsalted butter, meltedWhy this? Melted butter creates a denser, fudgier texture
- 1 cup (200g) granulated sugar
- 2 large eggs
- 1 tsp (5ml) vanilla extract
- 1 tbsp (15ml) red gel food coloringWhy this? Keeps the batter thick and color vibrant
- 1/3 cup (30g) unsweetened cocoa powder
- 1 cup (125g) all purpose flour
- 1/4 tsp (1.5g) salt
- 1/4 tsp (1.5g) baking soda
Cream Cheese Frosting:
- 8 oz (225g) full fat cream cheese, softenedWhy this? Full fat prevents the frosting from weeping
- 1/4 cup (55g) unsalted butter, softened
- 2 cups (240g) powdered sugar
- 1 tsp (5ml) vanilla extract
- 1 tbsp (15ml) heavy cream
Essential Gear Needed
You don't need a professional kitchen for this. A basic set of bowls and a whisk will do. However, using a parchment paper sling in your pan is a lifesaver for getting the bars out without them breaking.
- 8x8 inch square baking pan
- Parchment paper
- Large mixing bowl
- Silicone spatula
- Electric hand mixer (for the frosting)
Steps for Best Results

Follow these steps closely. The sensory cues are your best guide to knowing when to move on.
- Preheat oven to 350°F (175°C) and line your 8x8 inch pan with parchment paper.
- Whisk melted butter and granulated sugar in a large bowl. Add eggs and vanilla, beating for 60 seconds until the mixture looks pale and smooth.
- Stir in red gel coloring until the color is uniform. Sift in cocoa powder, flour, salt, and baking soda, then fold using a spatula until just combined. Note: Stop folding as soon as the flour disappears to keep them fudgy.
- Pour batter into the pan and bake for 25–30 minutes until the edges are set and the center has a slight jiggle. You should smell a rich, toasted chocolate aroma filling the kitchen.
- Allow the Red Velvet Brownies to cool completely in the pan. This takes about an hour.
- Beat softened cream cheese and softened butter with a mixer until the texture is fluffy.
- Gradually mix in powdered sugar and vanilla. Add heavy cream one teaspoon at a time until the frosting is spreadable but holds its shape.
- Spread the frosting in a thick, even layer over the cooled brownies.
Chef's Note: If your frosting feels too soft, pop it in the fridge for 10 minutes before spreading. It makes it much easier to get that smooth, professional look.
Fixing Common Baking Errors
Even with a good plan, things happen. Most issues with Red Velvet Brownies come down to temperature or mixing.
Brownies are Too Cakey
This usually happens if you over beat the flour or use too much baking soda. The result is a spongy texture instead of a chew. Next time, fold the dry ingredients in by hand.
Frosting is Too Runny
If the cream cheese was too warm or you added too much heavy cream, the frosting won't hold. To stabilize it, Serious Eats suggests ensuring your cream cheese is only slightly softened, not melty.
Color Faded After Baking
Liquid dyes often break down under heat. Gel colors are more stable. If the color looks dull, check that your baking soda isn't expired, as the pH level affects the red hue.
| Problem | Root Cause | Solution |
|---|---|---|
| Sinking Center | Over mixed batter | Fold dry ingredients gently |
| Grainy Frosting | Cold cream cheese | Let ingredients reach room temp |
| Dry Edges | Over baked | Remove when center still jiggles |
Swaps and Creative Twists
If you want to change things up, you can easily tweak this recipe. For something even more indulgent, try adding a swirl of the cream cheese batter into the red batter before baking. This creates a Red Velvet Cheesecake Brownies effect.
If you're in the mood for something different but still chocolatey, my cocoa powder brownies are a great alternative.
- White Chocolate: Fold in 1/2 cup of white chocolate chips for extra sweetness.
- gluten-free: Use a 1:1 GF flour blend. The texture remains quite similar.
- Vegan: Use flax eggs and vegan butter, though the lift will be slightly lower.
- Nutty: Add chopped pecans to the batter for a traditional Southern twist.
Scaling Guidelines
You can adjust the batch size, but baking times will shift.
Scaling Down (Half Batch): Use a loaf pan instead of a square pan. Reduce the baking time by about 20%. Since you can't easily halve an egg, beat one egg in a small bowl and use half of the liquid.
Scaling Up (Double Batch): Use two 8x8 pans rather than one large deep pan. This ensures the center cooks through without burning the edges. Only increase the salt and baking soda by 1.5x, not 2x, to avoid a metallic taste.
| Batch Size | Pan Type | Temp Change | Time Adjustment |
|---|---|---|---|
| 1/2 Batch | Loaf Pan | None | -5 to 8 mins |
| 2x Batch | Two 8x8 Pans | -25°F | +5 mins |
Red Velvet Truths
There's a lot of noise about what makes a dessert "red velvet."
Some say it's just chocolate cake with dye. That's not quite true. The original version relied on a reaction between cocoa powder and acid (like vinegar or buttermilk) to create a specific crumb. In these Red Velvet Brownies, the cream cheese frosting provides that necessary tang to balance the sugar.
Another myth is that you need a professional food colorant. While gel is better, you can use high-quality cocoa and a bit of red dye, and it will still taste great.
Storage and Waste Tips
These bars stay fresh for a while if you keep them sealed. Store them in an airtight container in the fridge for up to 5 days. Because of the cream cheese, they must be refrigerated.
For long term storage, you can freeze the brownies. Wrap them individually in plastic wrap and then place them in a freezer bag for up to 3 months. Thaw them in the fridge overnight.
To avoid waste, if you have leftover frosting, don't throw it out. It's a great topping for my red velvet cupcakes or even just spread on a piece of toast for a decadent breakfast.
Ways to Serve These
Since these are quite rich, a little goes a long way. I like to serve them with a handful of fresh raspberries or a slice of strawberry on top to cut through the sweetness.
For a party, cut them into small 1 inch squares. This makes them feel more like petit fours and less like a heavy dessert. They also pair well with a cold glass of milk or a bitter espresso, which balances the sugary notes of the frosting.
Whether you're making these from scratch for a special date or just because it's Tuesday, the key is in that contrast between the fudgy red base and the velvety cream cheese topping. Just remember to let them cool, or you'll end up with a delicious, red puddle.
Recipe FAQs
How to make a red velvet brownie?
Preheat your oven to 350°F. Whisk melted butter and sugar, beat in eggs and vanilla, stir in gel coloring, and fold in the dry ingredients before baking in an 8x8 pan for 25 30 minutes.
What is the secret ingredient in red velvet?
Cocoa powder combined with an acid. While this recipe uses baking soda to create the characteristic crumb, the vivid color comes from red gel coloring. If you enjoyed achieving this specific color profile here, see how it's used in a smooth chocolate dessert.
Can I turn red velvet cake mix into brownies?
No, the ratios are too different. Cake mix contains leavening agents for a fluffy texture, whereas brownies require the denser structure provided by melted butter and a higher sugar-to-flour ratio.
What are some good toppings for red velvet brownies?
Cream cheese frosting is the gold standard. You can also add a light dusting of cocoa powder or a sprinkle of sea salt to balance the sweetness of the powdered sugar.
How to prevent the brownies from overbaking?
Remove the pan when the center has a slight jiggle. Baking for exactly 25 30 minutes ensures the edges are set while the middle remains fudgy rather than cake like.
Is it true that you must use liquid food coloring for the best red color?
No, this is a common misconception. Gel food coloring is superior because it provides a more intense hue without adding excess liquid that could compromise the batter's consistency.
How to store red velvet brownies to keep them moist?
Store them in an airtight container in the fridge. Because the frosting contains cream cheese, refrigeration is required to maintain safety and freshness for up to 5 days.
Red Velvet Brownies