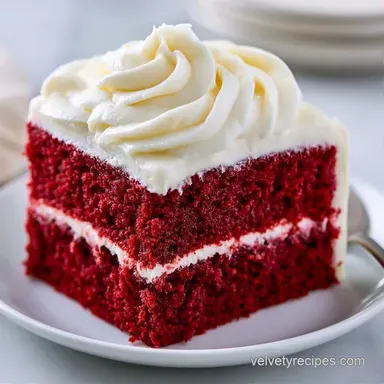
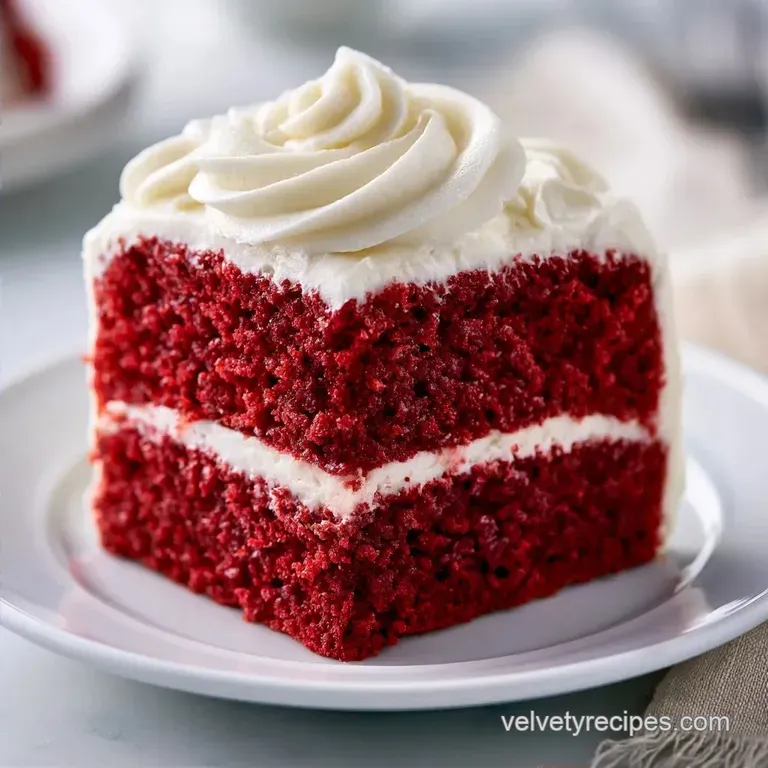
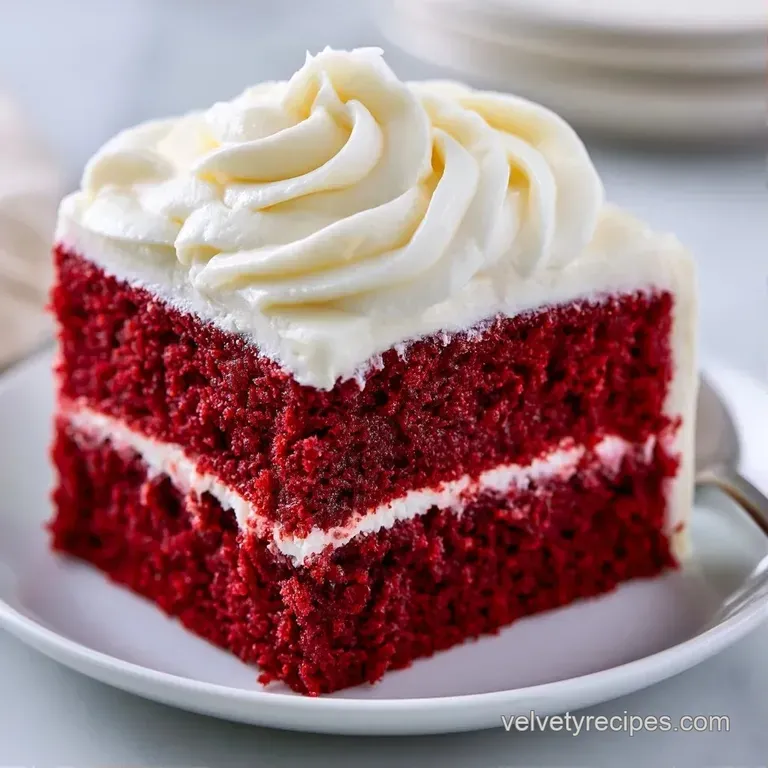
Traditional Red Velvet Birthday Cake: Silky and Moist
- Time: 20 min active + 30 min bake + 2 hours chilling = Total 2 hours 50 mins
- Flavor/Texture Hook: Pillowy, crimson sponge with a silky, tangy cream cheese finish
- Perfect for: Milestone celebrations, birthday parties, or when you need a showstopper dessert
That sharp, vinegary tang hitting the rich scent of cocoa - that's the smell of a real red velvet batter. Most people think it's just chocolate cake with a lot of food coloring, but it's actually something completely different. I remember the first time I tried to make this for my sister's birthday.
I used a massive amount of liquid dye, thinking more was better, and the result was a cake that looked like it belonged in a radioactive waste site and tasted like a chemistry set.
It took me a while to realize that the color and the texture are actually tied to the chemistry of the ingredients. When you get it right, the cake isn't just red, it's a deep, sophisticated crimson with a texture that feels like it's melting on your tongue. This Traditional Red Velvet Birthday Cake is the result of me figuring out that the "velvet" part comes from the oil and the buttermilk, not just the dye.
You can expect a cake that is strikingly bright but tastes subtly of chocolate. It's not a fudge cake, but it's not a vanilla cake either. It's that mysterious middle ground that pairs so well with the saltiness of cream cheese.
We're going for a tall, three layer masterpiece that holds its shape but stays incredibly moist.
The Texture Secrets
The magic of this cake isn't a secret, it's just a bit of kitchen science. If you've ever made my Homemade English Muffin recipe, you know how important the right leavening is for that specific crumb. Here, we're using a similar approach to get that airy yet dense feel.
- The Acid Kick
- Buttermilk and vinegar react with baking soda to create tiny bubbles, which gives the cake its lift and that distinctive tender crumb.
- Oil vs Butter
- Using vegetable oil instead of softened butter keeps the cake moist even when refrigerated, preventing that dry, crumbly texture common in butter based cakes.
- Cocoa Balance
- A small amount of cocoa powder provides a deep flavor without overpowering the red color or making the cake taste like a standard chocolate cake.
- Color Stability
- Gel food coloring is used instead of liquid because it provides a more intense hue without adding extra moisture that could mess up the bake.
| Method | Time | Texture | Best For |
|---|---|---|---|
| Fast Mix | 15 min | Denser, less air | Weeknight craving |
| Classic | 20 min | Pillowy, refined | Birthday parties |
| Slow Fold | 25 min | Ultra fine crumb | Professional look |
The Building Blocks
Before we dive into the mixing, let's look at what these ingredients are actually doing. It's not just about following a list, it's about understanding why we're using these specific items. According to Serious Eats, the acidity in buttermilk is key for breaking down gluten, which is why this cake feels so soft.
| Ingredient | Science Role | Pro Secret |
|---|---|---|
| Buttermilk | Acidic tenderizer | Use full fat for a more velvety mouthfeel |
| Baking Soda | Leavening agent | Must be fresh to get the proper rise |
| Vegetable Oil | Moisture barrier | Ensures the cake stays soft in the fridge |
| Cream Cheese | Flavor anchor | Cold cheese causes lumps; use room temp |
Equipment Needed
You don't need a professional kitchen, but a few specific tools will make this way easier. First, a stand mixer such as a KitchenAid is great for the frosting, but a hand mixer works fine too. You'll need three 8 inch round cake pans. I highly recommend lining the bottoms with parchment paper.
I once spent twenty minutes trying to flip a cake that had stuck to the pan, and it ended up looking like a crushed volcano.
A fine mesh sifter is also a must. Sifting the cocoa powder is non negotiable because cocoa loves to clump, and there is nothing worse than biting into a pocket of dry, bitter powder in a bright red cake. Finally, a flat spatula or an offset spatula will help you get those clean, sharp edges on the frosting.
Essential Ingredients
For the Sponge:
- 2.5 cups (310g) all purpose flourWhy this? Provides the necessary structure without being too heavy
- 1.5 cups (300g) granulated sugarWhy this? Sweetness and moisture retention
- 1 tsp (5g) baking sodaWhy this? Reacts with acid for the rise
- 1 tsp (2g) saltWhy this? Balances the sugar
- 2 tbsp (15g) unsweetened cocoa powderWhy this? Subtle chocolate base
- 1 cup (240ml) buttermilkWhy this? Essential for the tang and tenderness
- 2 large eggsWhy this? Binding and richness
- 1.5 cups (350ml) vegetable oilWhy this? Keeps it moist
- 1 tsp (5ml) distilled white vinegarWhy this? Boosts the leavening reaction
- 2 tsp (10ml) vanilla extractWhy this? Rounds out the flavor
- 1 tbsp (15ml) red gel food coloringWhy this? High pigment, low moisture
For the Cream Cheese Frosting for Red Velvet Cake:
- 16 oz (450g) full fat cream cheeseWhy this? The classic tangy base
- 1 cup (225g) unsalted butterWhy this? Adds stability and richness
- 4 cups (480g) powdered sugarWhy this? Sweetness and structure
- 1 tsp (5ml) vanilla extractWhy this? aromatic depth
- 0.25 tsp (1.5g) saltWhy this? Cuts through the sweetness
| Original Ingredient | Substitute | Why It Works |
|---|---|---|
| Buttermilk (1 cup) | Whole milk + 1 tbsp lemon juice | Mimics acidity. Note: Slightly less thick than real buttermilk |
| Vegetable Oil (1.5 cups) | Melted coconut oil | Similar fat content. Note: Adds a very faint coconut scent |
| All purpose Flour | Cake flour | Lower protein for softer crumb. Note: Cake may be more fragile |
| Gel Food Color | Beet powder | Natural color. Note: Result is more brown red than bright crimson |
Key Steps
Let's get into it. I like to break this down into phases so you don't feel overwhelmed. Right then, let's crack on.
Phase 1: Preparing the Crimson Batter
First, sift the flour, sugar, baking soda, salt, and cocoa powder into a large bowl to remove lumps and aerate the mixture. This ensures the dry ingredients are perfectly distributed. Note: Sifting prevents "cocoa pockets" in the finished cake.
In a separate bowl, whisk together the vegetable oil, buttermilk, eggs, vanilla, vinegar, and red gel coloring until the color is uniform. You want a consistent, bright red liquid before it ever touches the flour.
Gradually fold the wet ingredients into the dry ingredients using a whisk or mixer on low speed until just combined. Stop the moment you don't see any more streaks of flour. Do not overmix, or you'll develop too much gluten and lose that velvety feel.
Phase 2: The Precision Bake
Pour the batter evenly into three greased and parchment lined 8 inch round cake pans. Make sure they're level so you don't end up with lopsided layers.
Bake at 350°F (175°C) for 25–30 minutes until a toothpick inserted into the center comes out with a few moist crumbs. If the toothpick is completely clean, you've probably overbaked it.
Let cakes cool in the pans for 10 minutes, then transfer to wire racks to cool completely. This waiting period is the hardest part, but if you frost a warm cake, your frosting will turn into a soup.
Phase 3: Whipping and Assembling
Prepare the frosting by beating softened cream cheese and butter together. Once smooth, add powdered sugar, vanilla, and salt until silky. Note: Be careful not to over beat the cream cheese, or it can become runny.
Layer the cooled cakes with cream cheese frosting between each layer and cover the exterior. Use a large dollop in the center and spread it outward toward the edges.
Chill the assembled cake for 2 hours to ensure stability and clean frosting layers. This is the secret to those professional looking slices that don't slide apart.
Chef's Note: For an extra professional finish, do a "crumb coat." Apply a very thin layer of frosting all over the cake and chill for 30 minutes. This locks in the crumbs so your final layer of frosting is perfectly smooth.
Troubleshooting Guide
Even for experienced cooks, cakes can be temperamental. If your Traditional Red Velvet Birthday Cake isn't behaving, it's usually a simple fix.
| Issue | Solution |
|---|---|
| Why Your Cake Sunk | If the center of your cake dipped, it's often because the oven door was opened too early, letting out the heat, or the baking soda was expired. |
| Why Your Frosting is Runny | This usually happens if the butter or cream cheese was too soft (almost melting) when you started. |
| Why Your Cake is Too Dark | If the cake looks brown instead of red, you might have used too much cocoa powder or a "Dutch processed" cocoa. |
Common Mistakes Checklist:
- ✓ Did you sift the cocoa powder?
- ✓ Is the cream cheese truly room temperature?
- ✓ Did you use gel coloring instead of liquid?
- ✓ Did you wait for the cakes to cool completely?
- ✓ Did you avoid overmixing the batter?
Adjusting the Batch
If you're feeding a small group or a whole office, you can easily scale this.
Scaling Down (½ Batch): Use two 6 inch pans instead of three 8 inch pans. Beat one egg and use half of it. Reduce the baking time by about 20% and start checking at 20 minutes.
Scaling Up (2x Batch): I don't recommend doubling the batter in one bowl unless you have a huge professional mixer. Work in batches. For the spices and salt, only increase to 1.5x to avoid an overpowering taste.
If you're baking more layers at once, lower the oven temp to 325°F (160°C) and extend the bake time by 5-10 minutes to ensure even heat distribution.
If you want a different dessert vibe altogether, maybe something savory, you could pair a slice of this with a side of my Traditional Onion Cake for a wild sweet and savory party platter.
Red Velvet Myths
Let's clear some things up. First, there's a huge misconception that red velvet is just "chocolate cake with red dye." That's a lie. The chemical reaction between the cocoa, vinegar, and buttermilk creates a specific flavor and texture that a standard chocolate cake simply doesn't have.
Second, some people think you need a massive amount of food coloring to get the color. Actually, using too much can leave a bitter, metallic aftertaste. high-quality gel coloring is all you need for that vivid crimson.
Finally, people often think the frosting is optional. Trust me on this: the tang of the cream cheese is what balances the richness of the oil based cake. Without it, the cake is just... okay. With it, it's a masterpiece.
Storage Guidelines
Fridge Storage: Keep the cake in an airtight container or a cake dome in the fridge for up to 5 days. Because of the cream cheese and oil, it actually stays moist longer than most cakes. Always let a slice sit at room temperature for 20 minutes before eating for the best texture.
Freezer Storage: You can freeze the unfrosted layers. Wrap them tightly in plastic wrap and then foil. They'll stay fresh for up to 3 months. Thaw them in the fridge overnight before frosting.
Zero Waste Tips: Don't throw away the cake scraps from leveling the tops! Crumble them into a bowl, mix with a bit of leftover frosting, and roll them into cake pops. Also, if you have leftover buttermilk, use it for a batch of fluffy pancakes the next morning.
Perfect Complements
Since this cake is quite rich and sweet, you want something to cut through that indulgence. A sharp, fresh berry coulis or a handful of fresh raspberries on top adds a bright acidity that wakes up the palate.
For a drink pairing, a cold glass of milk is the classic choice, but a tart hibiscus tea or a strong black coffee balances the velvety cream cheese perfectly. If you're serving this at a party, keep the slices small - it's a dense cake, and a little goes a long way.
Trust me, once you make this Traditional Red Velvet Birthday Cake, you'll never go back to the store-bought versions. It's all about those small details - the sifted cocoa, the gel color, and the patience to let it chill. Now, go get your mixer ready and let's get baking!
Recipe FAQs
How to make a fluffy red velvet cake?
Sift the flour, sugar, baking soda, salt, and cocoa powder. This process removes lumps and aerates the dry ingredients, while folding in wet ingredients on low speed prevents overmixing.
What is a good red velvet cake recipe without buttermilk?
No, you should stick with buttermilk. The acid in buttermilk is required to react with the baking soda to create the signature lift and tender crumb.
Why did the center of my cake sink?
The oven door was likely opened too early. This allows critical heat to escape, though it can also be a sign that your baking soda has expired.
How to prevent the cream cheese frosting from becoming runny?
Ensure butter and cream cheese are softened but still cool. Using ingredients that are too warm or nearly melting will compromise the stability of the frosting.
Is it true that red velvet cake is just chocolate cake with food coloring?
No, this is a common misconception. Traditional red velvet relies on the specific chemical reaction between vinegar, buttermilk, and cocoa powder for its unique flavor and texture.
How to frost a bundt version of this cake?
Pour a silky glaze over the top. If you prefer this presentation, see how we achieve a similar finish in our red velvet bundt.
How to store this cake to keep it moist?
Keep it in an airtight container in the fridge for up to 5 days. Let each slice sit at room temperature for 20 minutes before eating to ensure the best texture.
Traditional Red Velvet Birthday Cake